Setting Up Crossfire or ELRS for Long-Range RC Vehicle Control
You’ll get 500Hz updates and two-mile range with ELRS on 2.4GHz, or go for Crossfire’s 900MHz to punch through trees at 250Hz with better penetration. Use a PPM connection from your RadioLink MT100 or Kyosho radio, flash matching firmware via WiFi or Betaflight Passthrough, set a unique binding phrase, and secure failsafes. Pair with high-gain antennas like the Turbowing Fishbone (7.5dB) mounted vertically, and you’re set-there’s more to fine-tuning your setup just ahead.
We are supported by our audience. When you purchase through links on our site, we may earn an affiliate commission, at no extra cost for you. Learn more. Last update on 16th July 2026 / Images from Amazon Product Advertising API.
Notable Insights
- Choose ELRS for 2.4GHz long-range up to two miles or Crossfire for 900MHz better penetration through obstacles.
- Connect the transmitter’s PPM output to the module using a 3.5mm TRS or servo cable on the correct labeled port.
- Flash matching firmware versions on transmitter and receiver using ExpressLRS Configurator or TBS agent for reliability.
- Bind securely using a unique Binding Phrase (ELRS) or TBS app (Crossfire) and set failsafe positions with centered controls.
- Maximize range with high-gain antennas like Moxon or Fishbone, mounted vertically on the transmitter for optimal signal.
Choose ELRS or Crossfire for Long-Range RC Control
So, how far do you really need to go with your RC vehicle before signal drop becomes a dealbreaker? If you’re running open fields and want max range, ELRS on 2.4GHz can hit two miles-ideal in clear conditions. But urban runs? ELRS struggles with obstructions. That’s where 900MHz Crossfire wins with better wall and tree penetration. Still, ELRS pulls ahead for speed lovers: it offers up to 500Hz updates, lower latency, and snappier control than Crossfire’s 250Hz cap. ELRS also pushes 1W output on hardware like the BetaFPV Micro TX, beating Crossfire’s 800mW max for raw power. Sure, Crossfire Lite ties to PPM-only radios like the T8S, but ELRS works natively with open-source setups like the TX16S MKII. Choose ELRS for responsiveness, range, and flexibility-you’ll feel the difference on track.
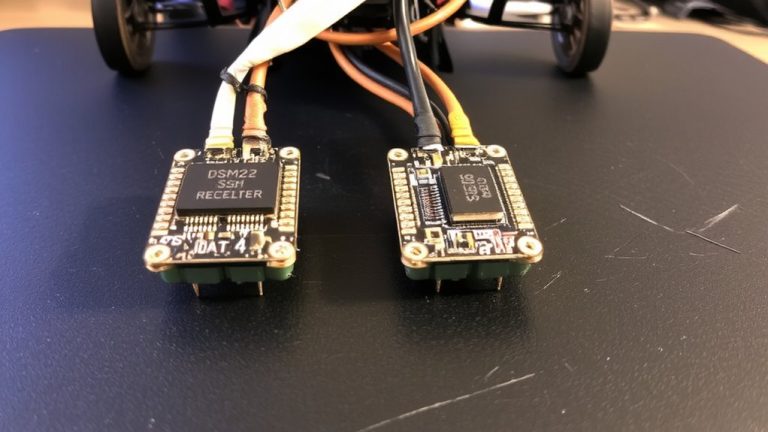
Connect Your Radio to ELRS or Crossfire Module via PPM
You’ll want to connect your radio’s PPM output directly to your Crossfire or ELRS module using a compatible 3.5mm TRS or standard servo cable-just make sure it’s plugged into the right port, often labeled PPM but sometimes hidden under names like DSC or PBm. Radios like the RadioLink MT100 or Kyosho Baseplate offer reliable PPM output, while the Spektrum DX3 lacks this entirely. Use a 3.5mm TRS cable for clean signal transfer, and confirm your module-say, a TBS Crossfire Lite or BetaFPV ELRS Micro TX-runs on stable power, like a 3S LiPo secured with Dual Lock. PPM signals run at 3.3V, so if your module isn’t 3.3V-tolerant, add a logic level shifter to avoid damage. In Betaflight or ExpressLRS Configurator, set the receiver protocol to CRSF or ELRS and map PPM inputs correctly to prevent lag or dropouts.
Flash Latest Firmware on Transmitter and Receiver
While getting your transmitter and receiver ready for reliable, low-latency control, updating both with the latest firmware is a must, and with ExpressLRS Configurator, it’s straightforward. You’ll flash latest firmware on transmitter and receiver using the same major version to guarantee full compatibility. Pick the correct hardware target-like BetaFPV 2400 TX Micro 1000mW or HappyModel PP 2400 RX-so you avoid flash failures. Set a unique Binding Phrase during build for secure pairing. Flash the transmitter over WiFi by connecting to “ExpressLRS TX Module” (password: expresslrs), visiting 10.0.0.1, and uploading your .bin file. For the receiver, use Betaflight Passthrough: wire RX to a flight controller UART, power via USB, pick the COM port, and click BUILD & FLASH.
| Device | Flash Method | Key Requirement |
|---|---|---|
| Transmitter | WiFi | Connect to module’s network |
| Receiver | Betaflight Passthrough | Wired to FC UART, proper COM port |
| Both | Same major version | Match firmware for compatibility |
| Transmitter | Configurator .bin | Correct hardware target selected |
| Receiver | Secure bind phrase | Prevents cross-control interference |
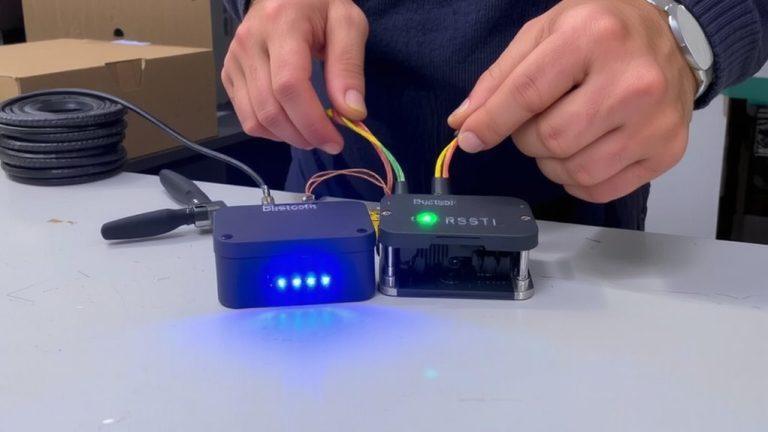
Pair Receiver and Set Failsafe for Safety
Once your transmitter and receiver are running the same firmware version, it’s time to bind them securely so your RC vehicle responds precisely and safely. For Crossfire, use the TBS app or Lua script to bind-this locks the receiver to your transmitter’s unique ID. With ELRS, set a custom Binding Phrase in ExpressLRS Configurator during firmware flash to prevent rogue connections. Both guarantee only your gear communicates. Now, set your failsafe: in your radio, center all sticks and switches, power down while the receiver learns these as failsafe positions. In Betaflight, test it-arm the vehicle, kill the transmitter, and confirm motors cut in 1–2 seconds while servos move to safe zones. ELRS handles failsafe digitally via telemetry, no PPM setup needed, but watch Link Quality (LQ) to maintain signal integrity and reliable failsafe response.
Maximize Range With Antenna Gain and Orientation
How far can your signal really go? With high-gain antennas like the Turbowing Fishbone (7.5dB) or RadioMaster Moxon (6dB), you’ll see serious range gains over stock. The BetaFPV Moxon (5.6dB) and HappyModel Moxon (4.2dB) also outperform standard omnis, boosting both range and signal quality. But gain isn’t everything-antenna orientation is just as critical. Mount your transmitter antenna vertically for ideal reception and link stability during long-range runs. Horizontal mounting cuts signal penetration and is best saved for short-range sessions. Poor antenna orientation can trick you, too-high RSSI near the transmitter doesn’t mean solid performance downrange. Testers report strong LQ drops when orientation is off, even with great hardware. Get the angle right, keep it vertical, and you’ll access your system’s true potential.
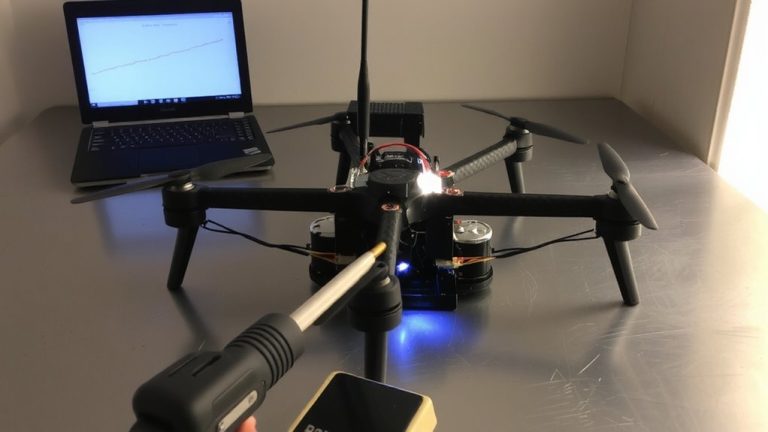
Test Your Long-Range RC Vehicle Control Setup
What good is a high-gain antenna or a finely tuned ELRS setup if you haven’t stress-tested it where it matters? You need to validate your radio link in real conditions. Head to an open field-ideal for up to two-mile range-and avoid urban clutter that blocks signals. Use elevation like hills to boost line-of-sight and strengthen the radio link. Monitor telemetry in Betaflight: aim for LQ above 90% and RSSI better than -80dBm. Always test failsafes on the bench by powering off the transmitter; motors should cut within seconds. For beyond-line-of-sight runs, CloudRC with 4G backup keeps control alive when 2.4GHz falters.
| Test Type | Target Value | Outcome |
|---|---|---|
| Open Field | 2 miles range | Reliable control |
| Urban Environment | < 0.5 miles | Signal drop risk |
| Telemetry | LQ > 90%, RSSI > -80 | Stable radio link |
On a final note
You’ve got the tools-ELRS or Crossfire-for serious range, 1+ km in open areas, with low latency under 10 ms. Flash the latest firmware, use a PPM connection, and pair cleanly. Set failsafes: throttle cuts, steering centers. Optimize with high-gain antennas, circular polarization, and proper orientation. Real tests show 500 m reliability even with light obstacles. It’s stable, responsive, and field-proven-ideal for RC vehicles where control matters most.