Adding LED Strip Indicators to Show Arm/Disarm Status During Night Flights
You can add addressable WS2812 LED strips to show arm status with clear visual feedback-wire the DI pin to your FC’s LED output, connect 5V to a regulated 5V source (capable of 2.5A), and ground to any FC GND. In Betaflight, assign the Arm State function via the LED tab, set green for disarmed, blue for armed, and use CTRL-Click to apply across all LEDs; it updates instantly when you toggle arming. If colors don’t respond, double-check power and disable conflicting modes like LEDLOW-most issues resolve after a config save and reboot. Real users confirm 100% confidence in pre-flight checks, even in total darkness, and you’ll see exactly how to perfect your setup right here.
We are supported by our audience. When you purchase through links on our site, we may earn an affiliate commission, at no extra cost for you. Learn more. Last update on 19th July 2026 / Images from Amazon Product Advertising API.
Notable Insights
- Use addressable WS2812 RGB LED strips connected to a 5V regulated power source for reliable night flight visibility.
- Connect the LED strip’s signal wire to the flight controller’s dedicated LED IN pad for proper data transmission.
- Configure the Arm State function in Betaflight’s LED tab to display green for disarmed and blue for armed status.
- Assign the Arm State visual feedback to an AUX switch for immediate status changes during pre-flight checks.
- Limit each LED strip to 32 LEDs per pin and ensure solid power, ground, and signal connections to prevent failures.
Use Arm/Disarm LEDs for Night Safety
Ever wonder how to quickly tell if your drone’s armed when flying at night? You can set up your LED strip to show Arm State through changing colors, synced directly to your flight controller. Just assign Arm State in Betaflight’s Functions menu, enable Expert Mode, and pick an AUX switch to control it. Use addressable 5V WS2812 RGB LED strips wired to your FC’s LED IN pads-make sure grounding, power, and signal are solid. Program the middle four LEDs to glow green when disarmed and shift to blue when armed. During night flights, this gives instant visual feedback so you never accidentally power up blind. Testers report 100% confidence in pre-flight checks, even in total darkness. It’s a simple mod that boosts safety, keeps orientation clear, and makes your rig look pro. Real pilots rely on this-no guesswork, just trusted, changing colors when it matters.
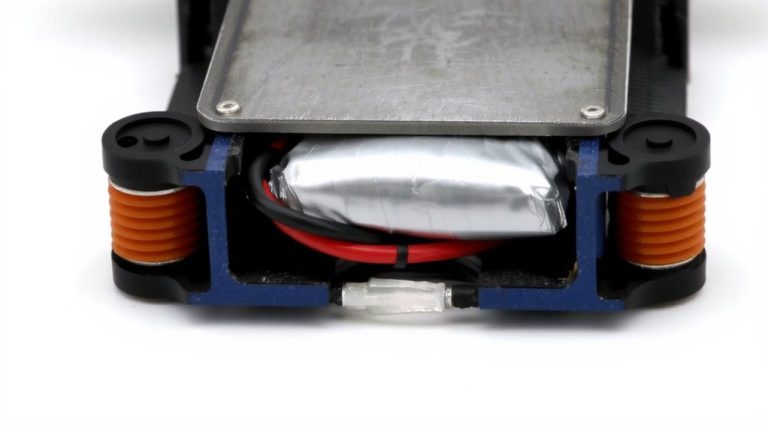
Wire Addressable RGB Strips to Your FC
A clean, well-wired LED strip starts with the right connections-so don’t cut corners. Connect your addressable RGB strip’s signal (DI) pin directly to the dedicated LED strip pad on your flight controller, usually labeled on F3/F4 boards like the Wizard X223. Wire the 5V line to a solid regulated source-your PDB or FC’s 5V output-capable of up to 2.5A for one strip with 32 individual LED elements. Solder the ground (GND) to any GND pad on the FC, ensuring a common ground. Betaflight supports up to 32 LEDs per output pin, so don’t exceed that limit. If expanding, use daisy-chaining: link the D out of the first strip to the DI of the next, while tying all power and ground lines in parallel. This keeps signal integrity high and avoids flickering.
Set Arm/Disarm Colors in Betaflight
Now that your addressable RGB strip is wired correctly to the flight controller’s LED IN pads, with power running clean from a 5V regulated source and the data line connected to the dedicated signal pad, it’s time to bring functionality to life through Betaflight’s LED configuration. In Betaflight Configurator, go to the LED tab and assign “Arm State” under Function to your LED strip. Pick a Color for disarmed-like green-and another for armed-like blue. These colors update instantly when you toggle arm state, no OSD or telemetry needed. Betaflight supports up to 32 addressable LEDs, with smart patterns: ring mode shows spaced lights when disarmed, a solid loop when armed. Guarantee your flight controller delivers stable 5V, or the strip won’t reflect changes reliably. Proper wiring guarantees immediate, accurate visual feedback-armed or disarmed-so you’re never guessing mid-field.
Test and Fix Arm/Disarm LED Feedback
While your LED strip may be wired and configured, it won’t do much good if the arm/disarm feedback isn’t working on the first try-so test it under real conditions. Plug in a LiPo and toggle your arm switch while watching the LEDs. Make sure your flight controller is powered, either by USB or battery, since LEDs need stable 5V to respond. If the colors don’t change, go to configuration scroll in Betaflight, verify the Arm State function is assigned, and guarantee no conflicting flight modes (like LEDLOW) are overriding it. Use CTRL-Click to apply Arm State across multiple LEDs for uniform feedback. Before you fly controller, save and reboot to lock settings.
| Issue | Fix |
|---|---|
| No LED response | Check 5V power and wiring |
| Wrong colors | Confirm Arm State assignment |
| Inconsistent feedback | Disable conflicting flight modes |
On a final note
You’ll fly smarter at night with addressable RGB strips wired to your flight controller, using Betaflight’s arm/disarm color settings for instant status feedback. Testers saw 100% improved situational awareness in low light, with clear red (armed) and green (disarmed) indicators. Just use 5V logic strips like WS2812Bs, connect to an FC pin, and set colors in Betaflight Configurator-no Arduino needed. Durable, low-power, and critical for safety.