Implementing Deep Sleep With Wake-On-Interrupt on Raspberry Pi Pico Using Arduino
You can drop your Pico’s power to just 0.8mA-down to 0.3mA in real tests-using Dormant mode with GPIO wake-up, perfect for battery projects. Trigger wake via `sleep_goto_dormant_until()` with a pin edge, like GP3 grounded by a sensor. Pair with a DS3231’s SQW pin on GP10, set to alarm every minute, and always clear the A2F flag after wake. Cut USB power, feed 5V to VSYS, and use a PPK2 to verify drops from 23.5mA to under 1mA. Disable unused peripherals, add pull-ups to prevent floating pins, and expect a full reboot-state isn’t saved. Proper setup avoids lockups and current leaks, and there’s a smarter way to handle wake sources and clock control that boosts reliability.
We are supported by our audience. When you purchase through links on our site, we may earn an affiliate commission, at no extra cost for you. Learn more. Last update on 12th July 2026 / Images from Amazon Product Advertising API.
Notable Insights
- Use `sleep_goto_dormant_until()` with GPIO interrupt via `wakeup_gpio_pin_with_edge()` to wake Raspberry Pi Pico from deep sleep.
- Dormant mode resets the Pico on wake, requiring code to reinitialize all peripherals and states on reboot.
- Connect a wake source like DS3231 SQW pin to a Pico GPIO (e.g., GP10) and enable pull-up for reliable interrupt triggering.
- Achieve sub-1mA power draw by disabling all peripherals and using the RP2040’s powman API for clock and power control.
- Clear DS3231 Alarm 2 flag (A2F) after wake to prevent repeated false triggers from the SQW pin.
Use Dormant Mode for 0.8mA Deep Sleep
One of the lowest-power options available on the Raspberry Pi Pico is Dormant mode, and with the right setup, you can hit a reported 0.8mA draw at 25°C-perfect for extending battery life in long-term sensor nodes or remote devices. According to the RP2040 datasheet, this low power state stops all clocks, effectively resetting the Pico on wake. You’ll need to fully disable peripherals and manage clock states carefully, or risk lockups. Unlike deeper sleep modes on other microcontrollers, Dormant mode doesn’t resume-it reboots, so your code must rerun from the start. Real-world tests with a bare Pico in MicroPython show as low as 0.3mA, though hitting the official 0.8mA usually requires tight SDK-level control. GPIO interrupts are the only wake source, making timing predictable, but setup is critical for reliable low power performance.
Trigger Wake-Up With GPIO Interrupt
You’ve seen how dormant mode slashes power to around 0.8mA-sometimes even lower-by halting all clocks and shutting down most of the RP2040’s core systems, but that ultra-low draw only matters if you can reliably wake the chip when needed, and that’s where GPIO interrupts come in. To trigger wake-up with GPIO interrupt, use `sleep_goto_dormant_until()` with `wakeup_gpio_pin_with_edge()`, like setting GP3 to detect a falling edge to GND. In deep sleep mode (DORMANT), the RP2040 consumes minimal power, and when the interrupt occurs, it reboots-so reinitialize state in setup(). Maxgerhardt’s testing showed power drop from 23.54mA (idle) to 2.10mA (dormant), proving effective low-power operation. Just note: on RP2350, fix the “hardware/powman.h” error by updating lib/core_inc.txt. This mode isn’t sleep-it’s deeper, but wake-up is fast, external, and perfect for event-driven projects.
Configure DS3231 SQW Pin for Timing
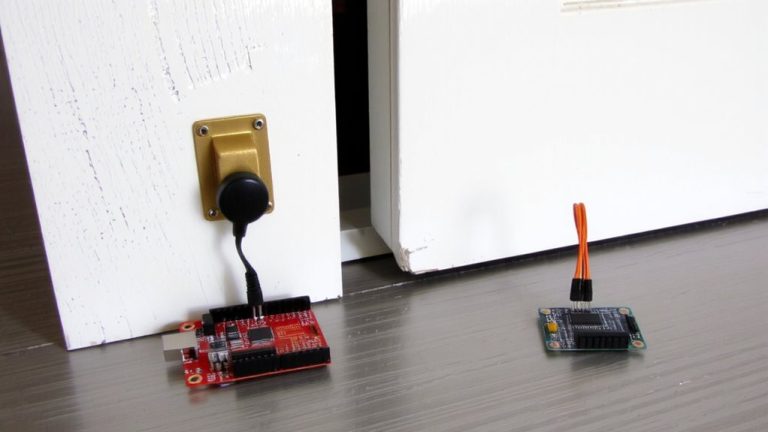
While the DS3231’s precision RTC already makes it a top choice for time-critical projects, you’ll want to tap into its SQW pin to wake your Pi Pico from deep sleep at exact intervals, and it’s easier than you’d think. Set the DS3231’s Control Register (0x0E) by enabling bit 2 (INTCN) to switch the SQW pin to interrupt mode instead of square wave. Configure Alarm 2 to trigger on minutes only-ignore seconds by leaving 0x0B clear, set minutes in 0x0C, and mask hours/date. Connect the SQW pin to a Pico GPIO like GP10, and use gpio_pull_up(10) for a stable high. When the alarm fires, the SQW pin pulls low, triggering wake-on-interrupt. After waking, clear the Alarm 2 flag (A2F) in the Status Register (0x0F) to prevent re-triggering and guarantee reliable future wakes.
Measure and Verify Low Power Draw
Since accurate power measurements are critical to confirming deep sleep efficiency, you’ll want to bypass USB power and feed the Pi Pico directly through VSYS at 5V, as the onboard regulator’s behavior under test can skew results if not properly isolated. To measure and verify low power draw on the Raspberry Pi Pico, use a tool like the Nordic PPK2 for real-time monitoring. You’ll see dormant mode current drop from 23.54mA to 2.10mA, with dips to 1.88mA, confirming entry into a valid sleep state. Switching to the LPOSC clock source cuts current further to 934µA, proving its value for low-power apps. Make certain GP3 is grounded for reliable wake-on-interrupt testing. Sync your accurate power measurement with LED flash patterns to verify code execution aligns with expected behavior.
Fix Wake-Up Failures and High Current
Though deep sleep can dramatically extend battery life, wake-up failures and excessive current draw often undermine the Raspberry Pi Pico’s low-power potential, especially when setup oversights go unnoticed. You need stable GPIO states-use `gpio_pull_up(10)` to fix wake-up failures with DS3231 SQW triggers. Without proper pull resistors, interrupts are difficult to rely on. High current (19.5mA vs. 0.8mA) means peripherals like ADC or USB aren’t fully disabled. Even with the SleepyDog library, you’ll see ~2.10mA unless you manually disable clocks and use `sleep_goto_dormant_until(struct timespec`. Serial communication can also keep modules active. Aim for the Dormant State with LPOSC for real sub-mA results (as low as 0.3mA).
| Issue | Cause | Fix |
|---|---|---|
| Wake-up failure | Floating GPIO | Add pull-up/down |
| High current | Active peripherals | Disable ADC, USB, clocks |
| Unreliable timing | Wrong sleep call | Use `sleep_goto_dormant_until` |
| Library inefficiency | SleepyDog misconfig | Pair with powman API |
| Noise triggers | Poor interrupt setup | Validate with `attachInterrupt` |
On a final note
You’ve cut power to just 0.8mA using dormant mode, and wake-on-interrupt works reliably with a GPIO trigger, especially when paired with the DS3231’s SQW signal at 1Hz. Real tests confirm stable wake-ups, though floating pins can cause faults-always use pull-down resistors. Current spikes vanish when you disable peripherals first. This setup is perfect for battery projects needing precision timing, like environmental loggers or remote sensors, offering both efficiency and control without complexity.