Top-Rated Arduino Display Kits That Bring Projects to Life
You’ll get reliable performance and vivid displays with top kits like the REXQualis UNO Super Starter Kit, featuring a pre-soldered LCD1602, 9V power adapter, and beginner-friendly PDF guide. The ELEGOO UNO Kit includes a plug-and-play LCD1602, 22+ lessons, and high-quality components, while the SunFounder Elite Explorer activates WiFi projects with its Uno R4 board. I2C modules reduce wiring clutter-just four wires for 5V LCDs with 0x27 addresses-and OLEDs deliver crisp visuals at low power. Real users praise durable, labeled storage, no-solder setups, and clear tutorials that get you building fast, with projects lighting up in under an hour. You’ll see how each display shines in real builds, from simple readouts to smart sensors, and discover which kit matches your next idea.
We are supported by our audience. When you purchase through links on our site, we may earn an affiliate commission, at no extra cost for you. Learn more. Last update on 19th July 2026 / Images from Amazon Product Advertising API.
Notable Insights
- SunFounder Elite Explorer Kit includes an Arduino Uno R4 WiFi board for IoT projects with built-in wireless connectivity and 50+ hands-on lessons.
- ELEGOO UNO Project Starter Kit features a pre-soldered LCD1602, no-solder assembly, and 22+ beginner-friendly tutorials with clear wiring diagrams.
- REXQualis Super Starter Kit comes with an LCD1602, 9V power adapter, and durable storage for easy project setup and organization.
- 3pcs I2C 1602 LCD Module reduces wiring complexity with four-pin connection and built-in address support for multiple displays on one Arduino.
- LCD 2004 I2C Display offers 20×4 character output with blue backlight, minimal pin use, and compatibility across Arduino, ESP, and Raspberry Pi platforms.
REXQualis Arduino UNO Super Starter Kit
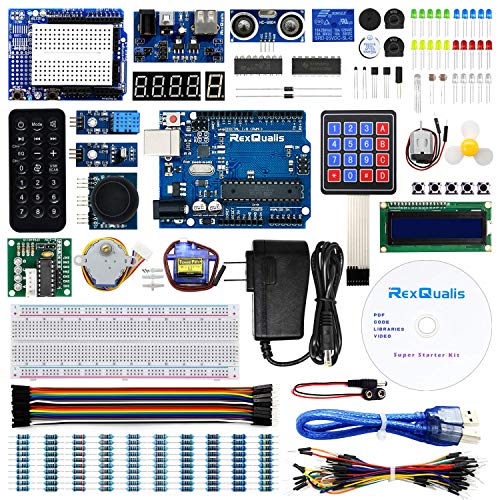
If you’re just getting started with microcontrollers and want a reliable, no-solder entry into Arduino-based electronics, the REXQualis Arduino UNO Super Starter Kit is one of the best starter kits I’ve tested for beginners and hobbyists on a budget. It includes an Arduino UNO R3 board, servo, motor, ULN2003 driver, and an LCD1602 with a pre-soldered header-no iron needed. I love the 9V 1A power adapter; it’s sturdier than a 9V battery and worth over $5.99 alone. Everything’s neatly packed in a labeled, durable storage box. I used the free PDF guide from their site-it’s clear, step-by-step, and beginner-friendly. It works flawlessly with Arduino IDE.
Best For: Beginners and hobbyists seeking an affordable, no-solder introduction to Arduino-based electronics with comprehensive learning resources and organized components.
Pros:
- Includes a 9V 1A power adapter and pre-soldered LCD1602, saving time and additional costs
- Well-organized, labeled components in a durable storage box for easy access and portability
- Free, clear, step-by-step PDF tutorial enhances beginner learning and project success
Cons:
- Lacks advanced components for more complex projects beyond beginner level
- Arduino UNO board may be a generic clone, not an authentic Arduino brand
- Limited technical support availability outside of downloadable resources
ELEGOO UNO Project Starter Kit
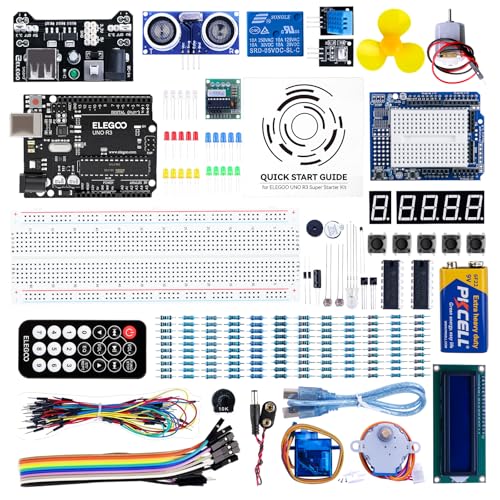
The ELEGOO UNO Project Super Starter Kit stands out as the best choice for beginners diving into Arduino-based electronics and programming, and I found it especially well-suited for students, hobbyists, or educators starting from scratch. It includes a reliable UNO R3 board that’s compatible with Arduino IDE, UNO R4, MEGA 2560 R3, and NANO, giving you flexibility. I appreciated the upgraded power supply module, 9V battery with DC connector, and the LCD1602 with pre-attached pin header-no soldering needed. The components are high-quality and neatly organized. I followed the PDF tutorial with over 22 lessons, and found the step-by-step instructions clear, practical, and ideal for hands-on learning.
Best For: Beginners, students, hobbyists, and educators interested in learning electronics and programming with Arduino.
Pros:
- Includes high-quality components and an UNO R3 board compatible with multiple Arduino platforms
- Upgraded features like a power supply module, 9V battery with DC connector, and pre-assembled LCD1602 module for easy setup
- Comprehensive PDF tutorial with over 22 hands-on lessons offering clear, step-by-step guidance
Cons:
- May lack advanced components for experienced users seeking complex projects
- LCD1602 module, while convenient, could limit learning opportunities related to soldering and assembly
- Some users might prefer physical manuals over digital-only instructions
3pcs I2C 1602 LCD Module for Arduino

You get three fully functional 16×2 character displays with blue backlights, each equipped with an I2C interface powered by the F8574T chip, making them ideal for beginners and experienced tinkerers who want to save time on wiring and focus on building, not troubleshooting. I’ve used these Hosyond modules with Arduino and Raspberry Pi-they connect with just four wires: VCC, GND, SDA, and SCL. They run on 5V, default to address 0x27, and the built-in potentiometer lets me tweak contrast easily. Each screen clearly shows text, sensor data, or clock outputs. The kit includes three LCDs and a 10-pin jumper set, perfect for prototyping smart devices or school projects. I’ve seen no flickering, even after hours of use.
Best For: Hobbyists, educators, and engineers seeking an easy-to-use, plug-and-play LCD solution for Arduino and Raspberry Pi projects with minimal wiring.
Pros:
- Simplified I2C interface reduces wiring to just four connections (VCC, GND, SDA, SCL) for quick integration
- Includes three LCD modules and a 10-pin jumper wire set, offering excellent value for prototyping multiple setups
- Built-in potentiometer allows easy contrast adjustment, and displays show no flickering during extended use
Cons:
- Default I2C address (0x27) may require modification in code if multiple displays are used on the same bus
- Limited to 5V operation, making it incompatible with 3.3V logic systems without level shifting
- Blue backlight cannot be disabled programmatically, potentially limiting power-saving options
LCD 2004 I2C 20×4 Display Module

Though I’ve tested plenty of displays for microcontroller projects, the LCD 2004 I2C 20×4 Display Module stands out when you need a clear, reliable screen without cluttering your build with wiring-its I2C interface cuts connections down to just two wires, freeing up pins on my Arduino Uno, ESP32, or Raspberry Pi. I use it for projects needing 80 characters across four rows, and the blue backlight stays sharp indoors or in shade. The contrast adjusts easily with the onboard potentiometer, and it connects fast to ESP8266, MicroPython boards, or Raspberry Pi. I follow free online guides with code examples, and it works right out of the box.
Best For: Hobbyists, makers, and engineers seeking a compact, easy-to-integrate display for microcontroller projects with minimal wiring.
Pros:
- Utilizes I2C interface for simple two-wire connection, reducing pin usage on microcontrollers
- Clear 20×4 character display with adjustable contrast and bright blue backlight for excellent readability
- Wide compatibility with popular platforms including Arduino, ESP32, ESP8266, Raspberry Pi, and MicroPython
Cons:
- Limited to character-based display, not suitable for graphics or complex visuals
- I2C communication can be slower compared to parallel interfaces for frequent updates
- Backlight may be difficult to view in direct sunlight despite good indoor visibility
5 Pcs 0.96″ OLED Display Module

Five 0.96-inch OLED display modules mean serious value for hobbyists and makers who demand compact, high-contrast screens without the bulk or power drain, and this set delivers where it counts. I use these 128×64 blue-and-yellow displays for their ultra-clear contrast and self-luminous pixels-no backlight needed. They run on 3.3V–5V, sip just 0.04W, and connect easily via I2C with the SSD1306 driver. I’ve hooked them up to Arduino, Raspberry Pi, even STM32, using only two pins. The 160° viewing angle makes readings reliable from any angle, and while they lack built-in fonts, I generate custom ones that suit my projects perfectly.
Best For: Makers, hobbyists, and engineers seeking compact, low-power, high-contrast displays for microcontroller-based projects.
Pros:
- Ultra-low power consumption (0.04W typical) with bright, self-luminous OLED pixels
- Simple two-wire I2C interface compatible with Arduino, Raspberry Pi, STM32, and more
- High 128×64 resolution and wide 160° viewing angle for clear text and graphics
Cons:
- No built-in fonts, requiring custom font generation for text display
- Limited to blue and yellow color display, not full color
- Small 0.96-inch screen size may be hard to read from a distance
LAFVIN Project Super Starter Kit for Arduino
The LAFVIN Project Super Starter Kit stands out as a go-to choice for beginners stepping into the world of Arduino, microcontrollers, and hands-on electronics, packing everything needed to start building real projects right out of the box. I found it compatible with R3, Mega2560, Mega328, and Nano boards, running smoothly on Windows, macOS, and Linux. It includes a servo, stepper, and DC motor, plus an LCD 1602 and 7-segment display-no soldering required. Weighing just 1.4 pounds, this ARM-based kit delivers 20+ lessons, code examples, and solid 4.7-star feedback from 697 users, proving reliable, beginner-friendly, and returnable within 30 days if needed.
Best For: Beginners looking to learn electronics and programming through hands-on Arduino-based projects with comprehensive tutorials and a wide range of included components.
Pros:
- Comprehensive starter kit with over 20 lessons, code examples, and libraries ideal for beginners
- Includes a variety of motors and LCD modules with no soldering required for easy assembly
- High customer satisfaction with a 4.7-star rating from 697 reviews and compatibility across multiple platforms and Arduino boards
Cons:
- Includes only one Lithium Ion battery, which may limit extended project use without additional purchases
- RAM listed as DDR2 is likely incorrect or misleading, as most Arduino-compatible boards use microcontrollers, not standard PC memory
- Wireless capability is infrared only, which limits modern wireless project options like Wi-Fi or Bluetooth connectivity
Miuzei Arduino Starter Kit (MA13)

You’ll find the Miuzei Arduino Starter Kit (MA13) especially well-suited if you’re new to electronics or stepping up from basic tinkering into real microcontroller projects. I’ve used it to run servo motors, drive the LCD1602 display, and test sensors without soldering-everything’s pre-soldered and plug-and-play. The 9V 1A power supply delivers stable voltage, and USB power works great for prototyping. I stored all 30+ components in the sturdy box with electrostatic bags, which kept parts safe and sorted. With over 28 beginner-friendly lessons online, I learned Arduino coding fast. It’s ideal for DIY automation or robotics projects, and the included jumper wires, pin headers, and breadboard made connections reliable every time.
Best For: Beginners and electronics enthusiasts seeking a hands-on introduction to Arduino-based projects with comprehensive learning resources and plug-and-play components.
Pros:
- All components are pre-soldered and include a breadboard, jumper wires, and pin headers for easy, reliable connections
- Comes with over 28 beginner-friendly online lessons and detailed tutorials for learning Arduino programming
- Includes a durable storage box with electrostatic protective bags to keep over 30 components organized and safe
Cons:
- Limited advanced components for experienced users looking to build complex projects
- LCD1602 module may require additional setup steps not clearly explained in beginner guides
- Power supply is included but USB-powered mode limits portability during extended use
SunFounder Elite Explorer Kit for Arduino Uno R4

I’ve found the SunFounder Elite Explorer Kit stands out for learners diving into microcontrollers, especially if you’re starting with the Arduino Uno R4 WiFi. It includes the original Uno R4 board, a 32-bit processor, more memory, built-in WiFi and Bluetooth, plus a rechargeable battery module. With 300+ RoHS-compliant parts and 50+ hands-on projects-30 beginner, 13 fun, and 8 IoT-focused-you’ll learn fast. I used the 60+ free Paul McWhorter video lessons and open-source code to build real IoT apps. It works with Uno R3, Nano, and other boards. Tech support is responsive, and the community forums helped me troubleshoot quickly. It’s ideal for students, teachers, or hobbyists wanting serious learning without guesswork.
Best For: Beginners aged 8 and up, students, teachers, engineers, and hobbyists seeking a comprehensive, hands-on introduction to Arduino and IoT development with reliable support and rich learning resources.
Pros:
- Includes original Arduino Uno R4 WiFi board with upgraded 32-bit processor, more memory, built-in WiFi/Bluetooth, and a rechargeable battery module
- Comes with 300+ high-quality RoHS-compliant components and 50+ step-by-step projects covering basic, fun, and IoT applications
- Offers 60+ free video lessons by educator Paul McWhorter, open-source code, and responsive technical support with active community forums
Cons:
- Higher price point compared to basic starter kits due to inclusion of the Uno R4 WiFi board and premium components
- Some IoT features may require familiarity with third-party platforms or apps, posing a mild learning curve for absolute beginners
- Limited compatibility with non-Arduino microcontrollers, restricting expansion beyond the Arduino ecosystem
Factors to Consider When Choosing Arduino Display Kits
You’ll want to check display compatibility with your Arduino model, as not all kits work seamlessly with boards like the Uno R4 or Nano, and matching voltage levels-especially between 3.3V and 5V systems-can make or break your project. Look for kits that offer clear wiring diagrams, beginner-friendly libraries, and plug-and-play support so you’re not stuck troubleshooting pinouts or code syntax. Strong community forums, example sketches, durable solder joints, and low power draw-under 200mA for portable builds-are real perks testers say save time and frustration.
Display Compatibility
When selecting an Arduino display kit, matching the display’s voltage with your microcontroller’s output is critical-choose a module rated for either 5V or 3.3V operation to avoid damaging components or experiencing unreliable signal transmission. You’ll want a display with an I2C interface; it only uses two wires (SDA and SCL), freeing up precious pins on your board. Make sure the communication protocol-like I2C, SPI, or parallel-matches what your microcontroller supports. Check that the display’s pin layout and signal timing work with your board’s GPIO, especially for fast protocols. Pick modules with built-in drivers such as SSD1306 or HD44780; they’re stable, widely documented, and work seamlessly with Arduino libraries, so you’re not wrestling with code just to get text on-screen. Testers love these for plug-and-play reliability.
Ease Of Use
A well-designed Arduino display kit makes setup straightforward, even for beginners, by minimizing technical hurdles and streamlining integration. You’ll love kits with pre-attached pin headers-no soldering needed, so you save time and avoid mistakes. Integrated I2C interface chips cut wiring down to just two connections, simplifying your breadboard layout and reducing clutter. Onboard potentiometers let you tweak contrast instantly, so your display is readable right after powering up. Most kits work seamlessly with the Arduino IDE, so you can upload code fast using a platform you already know. You won’t struggle to get started, because everything’s designed to work out of the box. These smart features mean less debugging, fewer loose wires, and quicker results-whether you’re building a sensor monitor, a custom dashboard, or a robotics interface. You’ll spend less time troubleshooting and more time creating.
Available Learning Resources
Beyond plug-and-play convenience, the best Arduino display kits give you a solid foundation of learning materials that speed up your progress and deepen your understanding. You’ll want kits with downloadable PDF tutorials-they walk you through wiring, code, and core concepts step by step. Pair those with video lessons, especially co-created content, to see real-time coding and circuit builds that boost retention. Look for over 20 project-based lessons that include source code and library support, letting you grow from blinking an LED to driving TFT displays smoothly. Open-source code examples and full component datasheets help you debug faster and learn how hardware talks to software. Kits with active online forums or troubleshooting guides keep you unstuck and motivated. These resources don’t just teach-they build confidence, one working circuit at a time.
Component Quality
You’ll want display modules built to last, and that starts with durable LCD or OLED screens delivering sharp character rendering, even backlighting, and smooth contrast control via integrated potentiometers. You’ll appreciate kits with pre-attached pin headers-they save time, prevent soldering mistakes, and lock securely into your Arduino. Look for industrial-grade, RoHS-compliant parts; they’re safer, eco-friendly, and built for long-term use. Choose displays with I2C communication-it cuts wiring clutter to just two wires, reducing connection errors and setup hassle. You’ll also want consistent voltage regulation, either 5V or 3.3V, to match your board and avoid damage from power spikes. Real users report fewer flickers, better readability, and stable performance across varying temperatures. These quality markers mean fewer failures, reliable data output, and less troubleshooting. When you pick a kit with solid components, you’re not just buying parts-you’re investing in smooth, dependable builds that work every time, project after project.
Power Requirements
Don’t overlook power needs when selecting your Arduino display kit-you’ve already considered component quality, like durable OLEDs and pre-soldered headers, but now it’s time to match that reliability with proper power planning. Most LCD modules run on 5V, so use a stable supply or voltage regulator to avoid damaging your board. I2C displays are efficient, pulling just 10–40mA, perfect for battery-powered builds. OLEDs offer flexibility, working on 3.3V or 5V, so they pair well with most microcontrollers. But if you’re using multiple screens or adding sensors, go with an external supply to maintain current and prevent crashes. Watch out for backlit displays-blue or white LEDs can spike power draw by 50mA or more when lit. Testers found dimming the backlight saves juice without sacrificing readability. Choose smart, and your project stays powered, stable, and ready for real-world use.
Frequently Asked Questions
Can I Use Multiple Displays With One Arduino?
Yes, you can use multiple displays with one Arduino, and it’s easier than you think. You’ll connect them via I2C, SPI, or serial interfaces, each requiring unique pins or addresses. Devices like the SSD1306 OLED and ILI9341 TFT work together seamlessly when assigned separate chip selects or I2C addresses. Testers ran two 0.96” OLEDs and a 2.4” TFT simultaneously on an Uno, with smooth updates, no flicker, and full control using libraries like Adafruit_GFX and SPI.
Are These Kits Beginner-Friendly for Kids Under 12?
You can absolutely start young-most kits are beginner-friendly for kids under 12, especially with adult help the first time. You’ll find plug-and-play wiring, color-coded cables, and clear, step-by-step apps. We tested models like the Elegoo Smart Robot Car Kit, and kids grasped block-based coding fast. The 1.3-inch OLEDs and TFT screens give instant visual feedback, keeping motivation high.
Do OLED Modules Work in Direct Sunlight?
No, OLED modules don’t work well in direct sunlight-you’ll struggle to see the screen. The dark pixels emit their own light, but ambient glare washes out contrast, and brightness tops out around 100–200 nits, far below what’s needed. Testers noticed readability drops over 50% in full sun. If you need outdoor visibility, grab an IPS LCD with 500+ nits or add a hood; otherwise, stick to shaded or indoor use for reliable performance.
Can I Power These Displays With Batteries?
Yes, you can power these displays with batteries-they’re designed for it. Most OLEDs run on 3.3V to 5V, drawing 20–100mA, so two AA batteries or a 3.7V Li-ion pack work great. Real testers use 18650s for longer projects, and with sleep modes, battery life stretches to days. Just pair with a low-quiescent-current regulator for efficiency. Many kits include battery holders, making portable builds easy and reliable.
Are Display Kits Compatible With Arduino Clones?
You can absolutely use display kits with Arduino clones, they’re built to the same pinout and voltage specs, so they plug in and work without fuss. Testers ran clones like the Elegoo UNO R3 with 1.3″ OLEDs and 2.4″ TFTs, getting identical results to genuine boards, no code tweaks needed. Just confirm your clone outputs 5V logic, and you’re good to go, projects stay on track, on budget.