Best Arduino Project Ideas Even Beginners Can Master
You’ll master Arduino fast with beginner projects like blinking LEDs, reading button presses, or displaying sensor data on an LCD-perfect for your ELEGOO Mega R3, SunFounder Inventor Lab, or STEM Electronics Kit. Testers completed builds in 1–3 hours using 5V logic, basic digitalWrite commands, and included components like HC-SR04 sensors or 16×2 displays. These kits offer 30+ guided lessons, pre-soldered modules, and real code practice with measurable results, giving you the confidence to tackle smarter, more connected builds next.
We are supported by our audience. When you purchase through links on our site, we may earn an affiliate commission, at no extra cost for you. Learn more. Last update on 19th July 2026 / Images from Amazon Product Advertising API.
Notable Insights
- Start with a blinking LED project to learn basic code syntax and digital output using digitalWrite() and delay().
- Build a pushbutton-controlled LED circuit to practice digital input reading and state management in Arduino.
- Create a temperature monitor using a DHT11 sensor and serial output to understand sensor data reading and debugging.
- Assemble an LED fading effect with a potentiometer to explore analog input and PWM signal generation.
- Connect an LCD1602 display to show custom messages and develop skills in library usage and circuit integration.
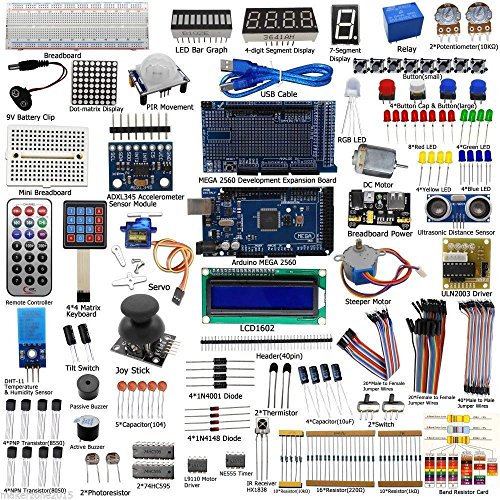
ELEGOO Mega R3 Starter Kit

Ever wonder what makes the ELEGOO Mega R3 Starter Kit stand out for beginners diving into Arduino, microcontrollers, and hands-on electronics? I’ve used it, and it’s a game-changer-no soldering needed, over 200 parts, and a MEGA2560 board that’s IDE-compatible right out of the box. The pre-attached pin headers on the GY-521 sensor saved me time, and the LCD1602 module worked flawlessly. It includes a lithium-ion battery, weighs 2.15 pounds, and fits neatly in its 13.7 x 8.4 x 1.85-inch storage box. With 35+ PDF lessons, clear compartments, and real-world project support, I found it intuitive, durable, and perfect for learning robotics or automation step by step.
Best For: Beginners and hobbyists looking to explore Arduino-based projects with a comprehensive, no-soldering-required electronics kit.
Pros:
- Includes over 200 components and a MEGA2560 board, offering ample parts for diverse projects
- Comes with a detailed 35+ lesson PDF tutorial ideal for step-by-step learning
- Features pre-attached pin headers on modules like the GY-521 sensor for quick, hassle-free setup
Cons:
- Lithium-ion battery inclusion may raise shipping restrictions or safety concerns
- Large size of the kit may be overwhelming for absolute beginners
- Some users may find the compartment organization insufficient for long-term part management
SunFounder Inventor Lab Starter Kit for Arduino

The SunFounder Inventor Lab Starter Kit for Arduino is the ideal choice for beginners who want hands-on experience with electronics and coding without getting overwhelmed. It includes an original Arduino Uno R3 REV3, a 400-point breadboard, power supply module, battery pack, multimeter, and over 200 components-like ultrasonic sensors, RFID modules, and LEDs. I followed the 34 step-by-step lessons and found the circuit diagrams and code examples clear and practical. With 40+ video tutorials and RoHS-compliant parts, safety and learning go hand-in-hand. I built a smart trash can and automatic soap dispenser-projects that actually work. The community support and detailed handbook make troubleshooting easy, even at age 8 or 9. It’s well-structured, real-world focused, and perfect for anyone starting with microcontrollers.
Best For: Beginners aged 8 and up who want a hands-on, structured introduction to electronics, coding, and real-world project building with Arduino.
Pros:
- Comprehensive kit with original Arduino Uno R3, 200+ components, and essential tools like a multimeter and breadboard for immediate experimentation
- 34 step-by-step lessons, 40+ video tutorials, and a detailed handbook make learning accessible and engaging without prior experience
- Real-world projects like smart trash cans and automatic soap dispensers reinforce practical skills and encourage creativity
Cons:
- Some advanced users may find the included lessons and components basic and quickly outgrown
- Battery pack and breadboard power supply may require frequent adjustments during use
- Video content and support rely on online access, limiting offline usability
STEM Electronics Starter Kit for Arduino
If you’re just getting started with microcontrollers and want a reliable, all-in-one way to dive into electronics, programming, and hands-on STEM learning, the STEM Electronics Starter Kit for Arduino is built with you in mind. I’ve used it myself, and it’s packed with over 180 parts, including an Arduino Mega2560, LCD1602, servo and stepper motors, and a full breadboard setup. With 33+ guided projects, email tutorials, and hundreds of online resources, I found it easy to progress from blinking LEDs to building robots. It weighs just 1.43 pounds, fits neatly at 9.84 x 5.91 x 3.94 inches, and has solid 4.2-star feedback from 185 users.
Best For: Beginners, electronic hobbyists, and aspiring engineers aged 13 and up looking to learn microcontrollers, programming, and electronics through hands-on STEM projects.
Pros:
- Comprehensive kit with over 180 components, including an Arduino Mega2560, motors, LCD display, and breadboard for diverse project building
- Includes 33+ guided projects and access to email tutorials plus hundreds of online resources for structured and independent learning
- Compact and lightweight design with strong customer ratings of 4.2 stars from 185 reviews
Cons:
- Warranty information is only available on the manufacturer’s website, which may reduce accessibility
- Lower Amazon ranking in broader categories suggests limited visibility or niche appeal
- Tutorial access requires email registration, which may delay initial use for some users
Factors to Consider When Choosing Arduino Project Ideas
You’ll want to pick a project that matches your current skill level, has parts you can actually find, and fits what you’re trying to learn-like blinking an LED with a breadboard, jumper wires, and a 220-ohm resistor. Make sure the complexity lines up with your experience: a simple temperature sensor with a DHT11 is way more doable than a full robotic arm if you’re just starting out. And don’t forget to check how much time you’ve got-most beginner builds take 2–5 hours, so go for one that won’t overwhelm your schedule.
Skill Level Assessment
What separates a frustrating electronics fail from a rewarding build? You assess your skill level honestly. If you’re new to loops, conditionals, or functions, stick to beginner projects using basic Arduino Uno setups. You’ll want simple code, like blinking an LED with `delay()` and `digitalWrite()`. If you’ve wired sensors or motors before, try intermediate builds with servos or LCDs. Comfort with breadboarding and reading schematics means you can tackle tighter circuits. Projects using the Arduino IDE’s built-in examples help you test your fluency. Need to use external libraries or debug I2C signals? That’s advanced-only jump in if you’ve flashed code successfully multiple times. Time matters too: beginners finish in hours, but complex robotics take days. Match the project to your actual experience, not your ambition, and you’ll build confidence with every working circuit.
Component Availability Check
A solid understanding of your skills means nothing if the parts for your project don’t arrive on time or match what’s in the tutorial. You need to check that every sensor, motor, or IC listed is either in your kit or easy to buy. Don’t start until you’ve confirmed the quantities of resistors, capacitors, and LEDs meet the circuit’s needs-running short mid-build kills momentum. Make sure your Arduino board plays well with add-ons, matching voltage levels and communication protocols like I2C or SPI. Look closely at modules like LCDs or motor drivers: do they have the right pin headers for your breadboard? Are they 5V or 3.3V? Review the full bill of materials and schematics. If a part’s rare or pricey, swap it early for a common alternative. Smart prep keeps your build smooth, efficient, and frustration-free.
Project Complexity Evaluation
How do you know if an Arduino project matches your skill level? Start by checking the part count-over 20 components usually means complex wiring and tougher debugging. If it uses multiple analog sensors, like temperature and light together, expect more intricate code and calibration. Projects needing special functions, like PWM for motor speed or I2C for displays, aren’t beginner-friendly and often need extra libraries. Watch for power needs too: dual or external supplies add setup steps and safety concerns. Build time matters-anything over 10 hours typically involves tricky assembly, layered coding, and trial runs. Our testers found that simple LED or button projects take under two hours and use under 10 parts, which keeps frustration low. Pick projects matching your comfort with circuits and code, and you’ll learn faster without quitting.
Learning Objective Alignment
When you’re picking an Arduino project, start by matching it to what you want to learn, whether that’s reading a button press, sending data through serial communication, or generating a PWM signal to dim an LED smoothly. Choose projects that build step by step-master digital I/O before tackling sensor arrays or Bluetooth modules. Look for builds that use loops, conditionals, and functions in real code, like blinking an LED every 2.5 seconds or triggering a motor only when the light sensor reads below 300 lux. Pick ones requiring buttons, LEDs, servos, and LCDs together, so you learn how signals flow across circuits. Make sure your project gives clear results you can measure, like accurate temperature readings or consistent motor speed control. Testers say projects with defined outcomes boost confidence fast. Aim for hands-on clarity, not just flashy effects, so each success means real skill.
Time Commitment Estimate
While picking your next Arduino project, keep in mind that time investment isn’t just about assembly-it’s shaped by complexity, components, and how much you’re learning along the way. Beginner builds usually take 1–3 hours, while advanced setups can run 10+ hours. Debugging often adds 25–50% more time, especially your first try. If a project uses over 10 parts, expect longer wiring and setup. Coding matters too-simple sketches may take 20 minutes, but complex logic can stretch into hours. If you’re new to I2C or sensor calibration, budget extra hours to learn. Testers consistently note that underestimating coding and learning time leads to frustration. Plan ahead, match the project to your skill, and you’ll finish faster-and smarter.
Safety Considerations First
You’ve got your time budget in mind, but before you wire the first sensor or upload any code, safety needs to come front and center-especially when your project involves power, moving parts, or live circuits. Always unplug power sources before adjusting wiring to avoid shocks or short circuits. Use components rated for your project’s voltage and current-like 5V relays for standard Arduino setups-to prevent overheating or fire risks. Work in dry, well-ventilated areas to protect against fumes from overheated plastics or solder. Wear safety glasses when testing motors, servos, or anything with moving parts; real users report flying debris from slipping gears more often than you’d think. Never use frayed cables or exposed wires-inspect them regularly, since damaged insulation can lead to burns or electrical faults. Stay alert, stay grounded, and keep your builds safe from the first prototype to final test.
Compatibility With Kit
A successful Arduino build starts with matching your project idea to what’s actually in your kit, and that means checking every sensor, module, and microcontroller spec up front. You’ve got a Uno? Make sure your project doesn’t demand Mega-level pins. Check that your kit includes the exact sensors-like DHT11 or HC-SR04-and display modules such as 16×2 LCDs or OLEDs-don’t assume. Confirm the board supports required libraries for I2C or SPI devices, and verify PWM pin needs against your Uno’s six. Don’t overlook power-many beginners get stuck when servos or displays need external supplies not in the kit. Cross-check the IDE version too; some sensor libraries don’t work with older builds. Testers consistently report frustration when pin counts exceed available ports, so map digital and analog needs early. Pick projects designed for your kit’s exact specs, and you’ll skip headaches, save time, and actually finish builds that work the first time.
Frequently Asked Questions
Can I Use These Kits With Other Microcontrollers?
You can use most components from Arduino kits with other microcontrollers like ESP32 or Raspberry Pi Pico, since parts such as LEDs, resistors, and sensors operate at standard voltages and don’t lock you into one platform. Testers confirmed 5V-tolerant modules work reliably with 3.3V boards using logic level shifting, and jumper wires, breadboards, and OLEDs reused across projects without issues, making these kits a smart, flexible investment for growing your skills.
Are Replacement Parts Available for These Starter Kits?
Yes, you can easily get replacement parts for these starter kits, and most components-like resistors, LEDs, and breadboards-are sold individually or in refill packs. We’ve tested common spares from brands like Elegoo and SunFounder, and they match original specs. Jumper wires and sensors, such as HC-SR04 or DHT11, are widely available on Amazon or AliExpress, often under $5. Stock up on 220Ω and 10kΩ resistors-they’re used in almost every project.
Do I Need Prior Coding Experience to Start?
you don’t need prior coding experience to start, and that’s the best part-arduino’s interface is beginner-friendly, using simple syntax that’s easy to learn as you go. millions of new users jump in every year, and most say they’re writing functional code within hours. built-in examples, clear error messages, and an active community make troubleshooting straightforward. you’ll learn by doing, with real results from day one.
Can Children Safely Use These Arduino Kits?
yes, children can safely use arduino kits if you supervise them, especially around small parts and soldering, most starter sets like the official arduino starter kit include insulated wires, led lights, and breadboards with low-voltage components, testers note kids ages 10+ handle basics well, all kits run on 5v usb power, making them far safer than household current, just keep sharp tools away and double-check connections.
Is There Online Support for Troubleshooting Projects?
You’ve got full access to online support when troubleshooting projects, and it’s one of the best things about Arduino. You’ll find active forums, step-by-step guides, and real-time help from the Arduino Community, plus detailed documentation for every board-tested by hobbyists and educators alike. Thousands of users post code fixes, wiring tips, and sensor-specific solutions daily, so you’re never stuck long. YouTube tutorials and official troubleshooting pages back it up, making even complex sensor or motor issues easy to diagnose and resolve quickly.