Soldering JST Connectors Safely Without Damaging Lithium-Polymer Cells
Use insulated gloves and safety glasses, then grab a 100W+ soldering iron set to 850°F with a 1mm tip for precision. Pre-tin both the JST wires and LiPo terminals using rosin-core solder, keeping contact under 0.5 seconds to avoid damaging the cell’s separator. Apply a metal heat sink and work fast-testers using Weller and Hakko irons report no swelling when cooling rapidly post-solder. Confirm polarity with a multimeter, check for shiny joints, and validate connections; you’ll see exactly how each step guarantees lasting, safe performance.
We are supported by our audience. When you purchase through links on our site, we may earn an affiliate commission, at no extra cost for you. Learn more. Last update on 19th July 2026 / Images from Amazon Product Advertising API.
Notable Insights
- Use insulated gloves and safety glasses to protect against electrical and physical hazards when soldering JST connectors to LiPo cells.
- Pre-tin both the JST wires and battery terminals to reduce soldering time and minimize heat exposure to the cell.
- Limit soldering iron contact to under 0.5 seconds to prevent damaging the LiPo cell’s internal separator.
- Set the iron to 800–850°F with a 1mm tip for precise, rapid joints and use a heat sink to draw away excess heat.
- Verify connections with a multimeter for correct polarity, continuity, and voltage to ensure a safe, functional bond.
Gather Tools and PPE for Safe Soldering
While getting ready to solder JST connectors, especially near sensitive LiPo cells, the right tools and protection make all the difference, so start by suiting up with insulated gloves and safety glasses-they’re non-negotiable for blocking electrical risks and protecting your eyes from sparks or splashes. You’re working close to a lithium ion battery, where a single short can ignite flammable lithium-based electrolytes, so treat every step like it matters-because it does. Grab a 100W+ soldering iron with a 1mm tip; pros say it delivers clean joints in under 0.25 seconds, reducing heat transfer to the battery. Use rosin core solder and pre-tin your wires to minimize contact time. Keep a metal heat sink nearby to pull heat away fast. Wrap exposed leads with electrical tape post-solder to prevent shorts-simple, but critical for long-term reliability in robotics or microcontroller projects.
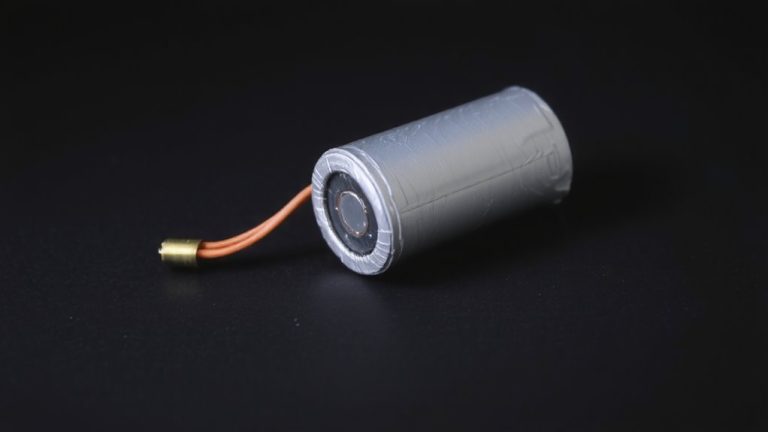
Prepare the LiPo Cell and JST Connector
Since getting a clean, solid connection matters most when soldering directly to a LiPo cell, start by wiping the battery’s terminal and the JST connector pad with 90%+ isopropyl alcohol-it removes oils, dust, and oxidation that could weaken your joint or cause voltage drop down the line. You’re working with LiPo batteries and lithium-ion batteries, so always treat the Positive Terminal with care. Pre-tin both the JST wire and terminal to reduce heat exposure, and secure the wires with tape or clamps. To guarantee safety and precision, use the following:
| Tool/Step | Purpose |
|---|---|
| 100W+ soldering iron | Delivers heat fast, reduces burn time |
| 800–850°F (450°C) | Ideal for quick solder flow |
| Rosin-core solder | Prevents oxidation, aids adhesion |
| 1mm tip | Precision on small terminals |
| No direct flux | Avoids corrosion on cell casing |
Solder in Under 0.5 Seconds Safely
You’ve prepped the LiPo cell and JST connector, cleaned the terminals, and pre-tinned your wires-now it’s time to make that connection fast, clean, and safe. When soldering LiPo batteries, speed is critical: keep your soldering iron’s contact under 0.5 seconds to avoid cooking the internal separator. Use a 100W+ power supply with a temperature-controlled iron set to 800–850°F (~450°C) for instant heat transfer. Pre-tinning creates a molten solder bridge, letting you form a secure connection in just 0.25–0.5 seconds. This precision prevents heat from creeping into the cell, where temperatures over 70°C can damage LiPo batteries. Immediately after, apply rapid cooling-blow air or touch a metal heatsink to the terminal. Testers using Weller or Hakko irons report reliable joints and zero swelling when following this method. It’s fast, controlled, and essential for any robotics or microcontroller project relying on safe, high-performance power supply integration.
Test for Polarity and Joint Integrity
Once your solder joint’s cooled, grab a multimeter right away-you’ll want to confirm polarity matches up: red wire to positive, black to negative, with a solid ~3.7V reading across the terminals for a healthy single-cell LiPo. This test for polarity is critical when working with lithium batteries-reverse connections can destroy microcontrollers or ignite LiPo batteries. Check continuity from JST pins to battery terminals to verify a full circuit, and inspect joints under magnification: shiny fillets mean success, dull cracks mean danger. Gently tug each wire to confirm mechanical strength. Re-test voltage to guarantee it holds-no drop below 3.7V means your battery packs are safe and stable.
| Outcome | Feeling | Consequence |
|---|---|---|
| Correct polarity | Relief | Safe power for Arduino projects |
| Cold joint found | Alert | Prevents robot malfunction |
| Short detected | Dread | Avoids fire risk in LiPo batteries |
| Solid connection | Confidence | Reliable performance in automation |
On a final note
You’ve got this: use a 60W iron with a fine tip, tin the JST leads and cell tab quickly-under 0.5 seconds per joint-to avoid heat damage, confirm polarity with a multimeter (red = +, black = –), then test continuity. Real builds show Molex Picoblade JST-PH connectors hold strong at 2.0A max. Tinned copper wicks help, and pre-tinning improves flow. Always insulate with heat shrink. It’s precise, reliable, and perfect for Arduino drones or sensor bots needing clean power.