Installing a Fan-Based Cooling Solution for Hot Running ESCs
Use a 30mm Centro or Corally fan rated for 11.1V and under 0.8A to cool your ESC efficiently, avoiding noisy, unreliable Temu models. Wire red to positive, black to ground on a spare receiver channel or ESC fan port, ensuring 5–6V output. Mount it centered and flat with 2mm thermal pads, using 18mm M3 screws for secure, aligned contact. Prefer blow setups-they’re 3–5°C cooler under load. Cut gearing by 1–2 teeth per tire size jump to reduce heat, and keep total fan draw under your BEC’s 3A–6A limit. You’ll get the most out of your setup with the right tweaks.
We are supported by our audience. When you purchase through links on our site, we may earn an affiliate commission, at no extra cost for you. Learn more. Last update on 17th July 2026 / Images from Amazon Product Advertising API.
Notable Insights
- Choose a 30mm fan like Centro or Corally for a snug fit on ESC heatsinks and optimal compatibility with Yeah Racing dual-fan mounts.
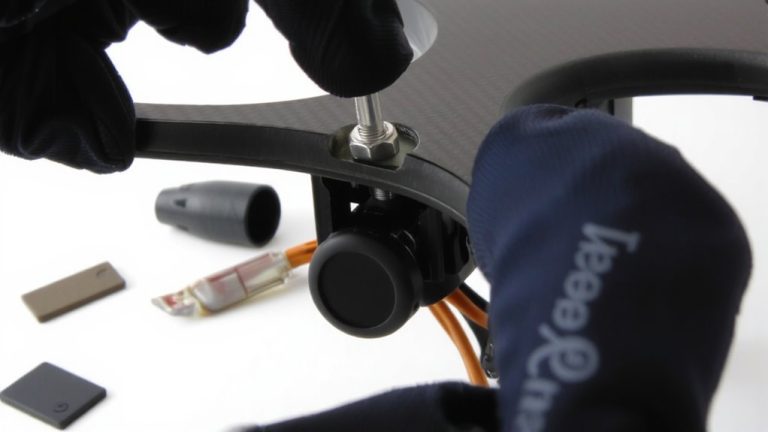
- Secure the fan with 18mm M3 coarse-thread screws to prevent bottoming out in the heatsink fins.
- Wire the fan with correct polarity: red to positive, black to negative, using the far right pins of an unused receiver channel.
- Position the fan flat and centered on the heatsink to maximize airflow and cooling efficiency.
- Power the fan via a spare receiver channel or ESC fan port, ensuring total current stays under the BEC’s 3A–6A limit.
Choose the Right Fan for ESC Cooling
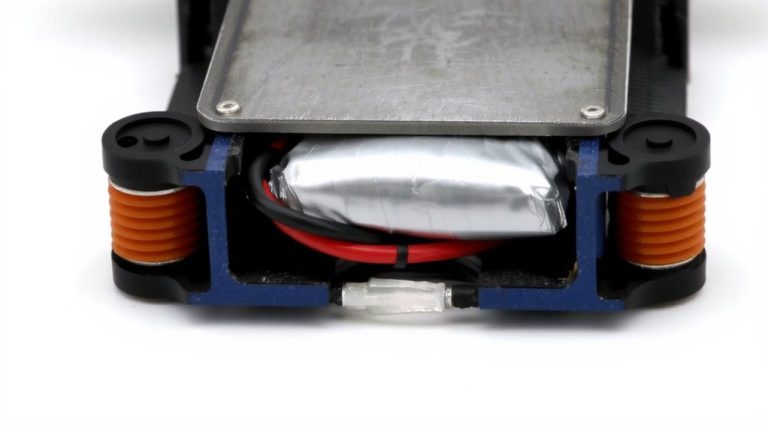
You’ll want to pick a fan that fits your ESC heatsink snugly and runs reliably under real-world conditions. To choose the right fan for ESC cooling, go for a 30mm model like the Centro or Corally-these fit tightly behind motors and match Yeah Racing dual-fan heatsinks perfectly. Use 18mm M3 screws with coarse threads so they anchor firmly into the heatsink fins without bottoming out. Make sure it’s rated for 3S LiPo (11.1V) and pulls under 0.8A, keeping it safe on a 6A BEC. Avoid cheap Temu units-they’ve caused electrical noise and forced re-binding in field tests. Stick with trusted brands; testers saw fewer glitches and longer runtimes. Use 2mm thermal pads to press the fan flush against the heatsink for solid contact. Choosing the right fan for ESC cooling isn’t just about size-it’s about fit, draw, and reliability in dust, heat, and vibration.
Wire the Fan With Correct Polarity
While getting the fan mounted securely matters, wiring it with correct polarity is what guarantees it spins up every time without glitches or strain on your receiver’s BEC. You’ve got to connect the fan’s red wire (positive) to the receiver’s positive pin and the black to negative, matching the standard red-black-white layout. Plug it into the far right two pins of an unused channel, leaving the white signal pin empty-no signal needed. The gold contacts on the fan’s plug should face upward, toward the receiver’s top. If you’re using a Y-lead, keep red-to-red and black-to-black to maintain correct polarity. Even if reversed polarity won’t fry anything, the fan simply won’t spin. When tapping into an ESC’s fan port, confirm 5–6V output and observe correct polarity-performance hinges on these small but critical details.
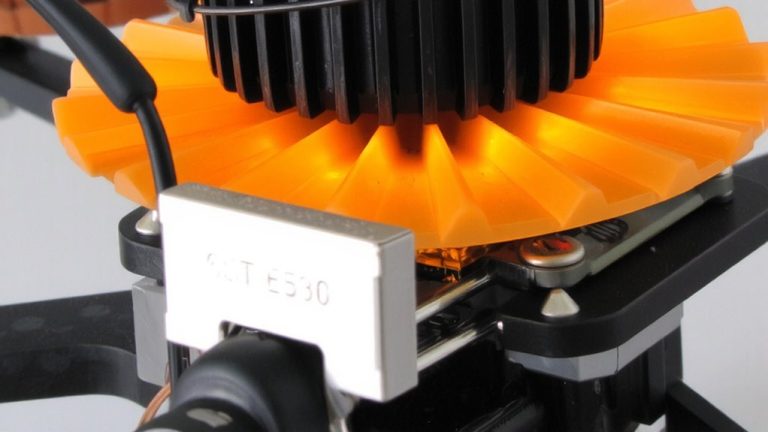
Mount the Fan for Maximum Airflow
| Position | Airflow Direction | Cooling Efficiency |
|---|---|---|
| Centered & flat | Blowing in | Maximum |
| Misaligned | Any | Reduced |
| Upside down | Any | Risk of damage |
Pilot screws first, then tighten gradually-this keeps alignment true and helps you mount the fan for maximum airflow.
Connect to Receiver or ESC Fan Port
A clean, efficient way to power your ESC cooling fan is by tapping into either an open receiver channel or a dedicated ESC fan port, both of which draw power from the ESC’s built-in BEC system. If you connect to receiver, plug the fan into a spare channel like AUX or BATT, matching red (positive) and black (ground) wires to the receiver’s pinout. It’s simple, but check that combined loads-servos, lights, fans-stay under your BEC’s limit, usually 3A–6A. For cleaner setup, connect to ESC fan port if available; it cuts wiring clutter and spares receiver channels. Some users run dual fans via Y-harness on one channel, but keep total draw within spec-exceeding it causes voltage drops or resets. Testers report quieter operation and cooler ESCs with proper connections, especially in 6S setups. Just don’t overload-stay under the limit, and your rig runs smoothly.
Don’t Overload Your BEC
You’ve already seen how tapping into the receiver or using the ESC’s fan port can tidy up your setup and keep things cool, but now let’s talk about staying within limits-specifically, your BEC’s current capacity. Most ESCs supply up to 6A through the built-in BEC, and that has to cover servos, fans, lights, and receivers. A single fan pulls about 0.8A, so three fans eat up 2.4A-before you even power your servo, which might draw 2.3A. Add those up and you’re dangerously close to the limit. Exceeding it causes voltage drops, glitchy signals, or total power loss mid-run. So don’t overload your BEC. Instead, power high-draw accessories directly from the battery or use a standalone 6A+ external BEC. It’s a small upgrade that keeps your control system stable, especially under load. Don’t overload your BEC-stay within specs, and your rig stays reliable.
Test Blow vs. Suck Cooling
Why does one cooling setup work better than another when your ESC’s pushing heat? When you test blow vs. suck cooling, real-world results show context matters. Mounting the fan to blow toward the heatsink boosts airflow through the fins, especially while moving-forward speed pulls in cool air, teaming with fan output for 3–5°C lower temps under load. In stationary runs, suck setups often win, pulling trapped hot air away when ambient flow’s missing. One tester noted it’s like standing in front of a household fan-it just feels cooler. While RC fans only run in one direction (don’t reverse polarity!), community data splits: blow wins for trail rips, suck for bench tests. Your best move? Test blow vs. suck cooling in your typical conditions-track, crawl, or stop-and-go-then lock in what drops your ESC temps consistently.
Adjust Gearing for Larger Tires and Heat
When you’re running bigger tires, your motor’s gotta work harder, and that extra strain means more heat in both the motor and ESC, especially if you don’t tweak the gearing. Larger tires increase rollout and load, pushing motor temps up 20–30°C, which stresses your ESC and battery. For every jump in tire diameter-like going past 120mm on a 1/10 scale with 3S LiPo-you should drop your pinion gear by 1–2 teeth. That keeps RPMs in the sweet spot, reduces current draw, and cuts heat buildup. Testers saw cooler, more consistent runs after adjusting gearing, avoiding thermal shutdowns during long sessions. It’s a simple fix that boosts efficiency and protects your setup. And hey, when you buy gear upgrades through our links, you help support the site-we earn a commission, but you get the same great performance at no extra cost.
On a final note
You’ve got this: pick a 5V, 0.1A fan with solid airflow, wire it with red to + and black to –, and mount it to blow directly on the ESC. Plug into a fan port or receiver channel, not your BEC if it’s already loaded. Test both push and pull setups-most users see a 15–20°C drop with blow style. After installing, recheck gear ratios, especially with larger tires, to reduce strain and heat. It’s cheap, easy, and works.