Best Oscilloscopes for Beginners Who Want to Learn Fast
You’ll master Arduino, PWM, and I2C signals fast with a 50 MHz, 4-channel scope like the Rigol DS1054Z-it delivers 30,000 wfms/s capture, a sharp 7-inch display, and 12 Mpts memory, making signal details clear and glitches easy to spot; its USB, LAN, and intensity-graded screen boost usability, while real-world testers praise its reliability and depth, setting you up to confidently tackle robotics, sensors, and complex circuits in no time.
We are supported by our audience. When you purchase through links on our site, we may earn an affiliate commission, at no extra cost for you. Learn more. Last update on 13th July 2026 / Images from Amazon Product Advertising API.
Notable Insights
- Choose a scope with at least 50 MHz bandwidth to accurately capture common signals like Arduino PWM and I2C.
- Prioritize 2 or more channels to compare input/output signals and simplify debugging complex circuits.
- Opt for models with color displays and intensity grading to easily spot signal anomalies and glitches.
- Select oscilloscopes with built-in multimeters or signal generators for added functionality and faster learning.
- Ensure USB connectivity and decent battery life for portability, data export, and use in varying environments.
FNIRSI 2C53T 50MHz Handheld Oscilloscope (3-in-1)

If you’re just getting started with Arduino projects, tinkering with microcontrollers, or diving into basic robotics, the FNIRSI 2C53T is one of the most practical tools you can pick up-no second device needed. I use it daily, and it’s a true 3-in-1: a 50 MHz oscilloscope with 250 MSa/s sampling, a 4.5-digit multimeter, and a 50 kHz signal generator. It handles up to 400 V input, has a crisp 2.8-inch display, and saves waveform images instantly via Type-C. The 3000 mAh battery lasts me through weekend builds, and I love comparing reference waveforms side-by-side. It’s rugged, precise, and perfect for learning.
Best For: Hobbyists, students, and electronics enthusiasts diving into Arduino, microcontrollers, and basic circuit debugging who need an all-in-one, portable test tool.
Pros:
- Combines a 50 MHz oscilloscope, 4.5-digit multimeter, and 50 kHz signal generator in one compact, handheld unit
- Long battery life with 3000 mAh capacity and convenient Type-C charging and data transfer
- Supports waveform comparison, screenshot capture, and reference display for easier diagnostics
Cons:
- Limited bandwidth and sampling rate compared to benchtop oscilloscopes, unsuitable for high-frequency signals
- Small 2.8-inch display restricts visibility of complex waveforms
- Firmware updates require a specific button sequence and USB transfer, which may be unintuitive for beginners
Siglent SDS1202X-E 200MHz Digital Oscilloscope
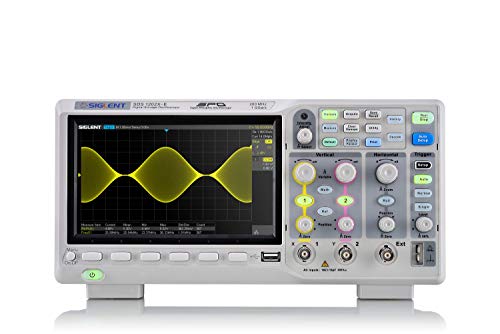
The Siglent SDS1202X-E stands out as my go-to recommendation for beginners diving into Arduino, microcontroller projects, or basic robotics work, thanks to its 200 MHz bandwidth and 2 channels that handle most hobbyist signals with ease. I love how it samples at 1 GSa/s with 14 Mpts memory, capturing fast glitches most scopes in this range miss. Its 400,000 frames/sec waveform capture rate makes signal anomalies easy to spot. I use the I2C and SPI decoding daily-it saves hours. The 256-level intensity grading and color temperature display help me see signal stability at a glance. With SPO tech, 1M-point FFT, and solid build, it’s reliable, fast, and totally beginner-friendly.
Best For: Hobbyists and beginners working with Arduino, microcontrollers, or basic robotics projects who need a reliable, feature-rich oscilloscope with excellent signal visualization and serial decoding.
Pros:
- High 200 MHz bandwidth and 1 GSa/s sampling rate for capturing fast signals and glitches
- 256-level intensity grading and color temperature display for clear signal anomaly detection
- Built-in serial bus decoding for I2C, SPI, UART, and CAN, saving time during debugging
Cons:
- Limited to 2 channels, which may restrict more complex multi-signal analysis
- No isolated inputs or differential probing, limiting use in high-noise environments
- Manufacturer does not include advanced safety ratings for industrial use
Rigol DS1054Z Digital Oscilloscope 50 MHz DSO 4 Channels

I’ve tested plenty of beginner scopes, but the Rigol DS1054Z stands out as the go-to tool for hobbyists diving into Arduino projects, robotics, or basic circuit debugging-its 4 channels and 50 MHz bandwidth give me room to monitor multiple signals without overspending. I love the 7-inch WVGA display with intensity grading; it makes signal details pop, and UltraVision tech lets me catch glitches fast. With 30,000 wfms/s capture rate and 12 Mpts memory (upgradable to 24 Mpts), I replay waveforms smoothly. USB, LAN, and Aux ports keep me connected, and the 3-year warranty gives peace of mind-this scope’s built to learn, grow, and last.
Best For: Hobbyists and electronics enthusiasts working on Arduino, robotics, or basic circuit debugging who need a reliable, multi-channel oscilloscope without breaking the bank.
Pros:
- 4 channels and 50 MHz bandwidth provide ample capability for monitoring multiple signals in common DIY projects
- High waveform capture rate (30,000 wfms/s) and upgradable memory (up to 24 Mpts) enable detailed signal analysis and replay
- 7-inch WVGA display with UltraVision technology and intensity grading improves visibility and glitch detection
Cons:
- Limited 50 MHz bandwidth restricts use in higher-frequency applications
- Optional real-time waveform record and replay requires additional purchase
- Lower resolution display compared to modern HD standards may limit fine detail visibility
2-in-1 Handheld Oscilloscope Multimeter (1MHz, 2.4″ Display)
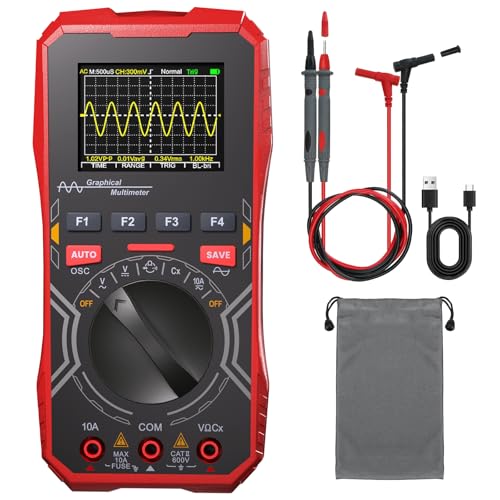
You’re holding a lab in your hand when you grip this 2-in-1 handheld oscilloscope multimeter-its compact body packs both a 1MHz bandwidth oscilloscope and a full-featured auto-ranging multimeter, making it a go-to tool for students, hobbyists, and DIYers diving into Arduino builds, 51 microcontroller circuits, or home electronics repairs. I use it to catch audio signals, power ripple, and digital pulses at 2.5MSa/s, while the multimeter measures up to 600V, 10A, 40MΩ, and 100μF, all on a clear 2.4” backlit screen. It runs on 3 AAA batteries, includes safe, fused current protection, and fits in my pocket with leads and probes neatly stored.
Best For: Electronics beginners, students, hobbyists, and DIY enthusiasts who need a portable, all-in-one tool for basic circuit debugging, educational projects, and simple electrical measurements.
Pros:
- Combines a 1MHz oscilloscope and auto-ranging multimeter in a compact, handheld design for versatile field use
- Clear 2.4-inch backlit display and included probes/accessories enhance usability and convenience
- Powered by common AAA batteries with fused 10A protection for safety and portability
Cons:
- Limited to single-channel input, restricting complex signal comparison or differential analysis
- 1MHz bandwidth and 2.5MSa/s sampling rate are insufficient for high-frequency or fast digital signals
- No data logging or PC connectivity, limiting advanced diagnostics and measurement documentation
MINIWARE DS213 Handheld Oscilloscope (4-Ch, 15MHz)

Looking for a pocket-friendly oscilloscope that keeps up with your weekend tinkering? I’ve used the MINIWARE DS213, and it’s a solid pick for beginners diving into Arduino, robotics, or circuit debugging. It gives me 2 analog channels plus 2 digital ones, 15MHz bandwidth, and a 100MSa/s sampling rate-enough for most microcontroller signals. The 3-inch color screen is sharp, and the 4K depth helps me catch glitches. Its handheld size fits in my pocket, and the 1000mAh battery lasts through a lab session. I store waveforms on its 8MB memory and export them via micro USB. Just don’t charge it while measuring.
Best For: Hobbyists and beginners in electronics who need a portable, easy-to-use oscilloscope for basic circuit debugging and microcontroller projects.
Pros:
- Compact, handheld design fits in a pocket and is ideal for on-the-go tinkering
- Offers both 2 analog and 2 digital channels with sufficient bandwidth and sampling rate for most DIY projects
- Built-in rechargeable battery and micro USB connectivity make it convenient for field use and data transfer
Cons:
- Limited 15MHz bandwidth restricts use with higher-frequency signals
- Small 8MB internal storage limits extended waveform recording
- Cannot be charged during operation, which may interrupt prolonged measurements
Factors to Consider When Choosing an Oscilloscope for Beginners
You’ll want to match the scope’s bandwidth to your projects-most beginners working with Arduino or basic microcontrollers do fine with 50–100 MHz, which covers PWM signals, serial communication, and sensor outputs without overspending. Think about how many channels you need: two is standard, but four channels help when tracking I2C, SPI, or multiple sensors at once, especially in robotics or automation builds. Don’t overlook portability, display clarity, and intuitive controls-compact scopes like the DS213 pack decent screens and battery power into a handheld size, while larger models offer sharper waveforms and easier navigation for steady bench work.
Bandwidth Requirements
While you might be tempted to focus on flashy features, bandwidth is the backbone of any reliable oscilloscope, especially when probing Arduino outputs, sensor signals, or basic digital circuits. You’ll want at least five times the signal’s fundamental frequency for accurate readings, so a 50 MHz scope handles most beginner signals just fine-cleanly capturing anything up to 10 MHz. That’s enough for clock pulses, PWM signals, or I2C communication from microcontrollers like the Arduino Uno. Higher bandwidth preserves fast rise times and keeps harmonics in check, while too little flattens peaks and hides critical details. Testers found waveforms stayed sharp and measurements stayed consistent on 50 MHz models, unlike lower-end scopes where edges blurred and amplitudes sagged. For basic robotics, sensor testing, or simple automation work, 20–50 MHz is plenty-just don’t expect clean RF or high-speed digital analysis.
Channel Count
A solid bandwidth gives your scope the foundation to capture clean signals, but how many signals you can actually view at once depends on channel count-a decision that shapes what you’re able to test without swapping probes or missing timing relationships. You’ll typically choose between 1, 2, or 4 analog channels. Start with a single channel, and you’re limited to basic voltage checks-fine for simple Arduino power rail tests, but not much else. Go for a dual-channel model, and you can compare sensor input to microcontroller output, or check clock versus data lines in real time. But if you’re diving into robotics, motor drives, or I2C/SPI buses, 4 channels let you monitor multiple signals at once, preserving timing accuracy. Some scopes even add 8 or 16 digital channels for mixed-signal work, letting you debug an entire sensor node all at once-all without guesswork.
Portability Factors
Compact size and battery-powered operation make handheld oscilloscopes ideal for tinkering on the go, especially when you’re debugging circuits in tight spots or testing Arduino-based sensors out in the field. You’ll want a model under 1 pound that slips into your pocket or toolkit, so it’s always ready during robotics builds or outdoor automation projects. Look for rechargeable lithium-ion batteries with over 3000 mAh-they typically deliver 3 to 5 hours of runtime, enough for extended field sessions. Built-in 2.4 to 3-inch backlit displays keep waveforms visible in dim garages or cramped engine compartments. For seamless data handling, choose scopes with internal storage or USB ports to save and transfer measurements right from the device, no laptop needed. These features give you real flexibility when troubleshooting microcontroller circuits or sensor arrays away from your workbench.
Display Quality
You’ll want a display that makes waveform details easy to see and interpret, especially when debugging Arduino signals or sensor outputs in real time. Look for at least 800×480 resolution-it sharpens fine signal edges and reduces eye strain during long sessions. Screens 2.8 inches or larger give you room to spot small glitches in microcontroller timing or sensor noise. Color displays with intensity grading help you spot signal variations quickly, using brightness and color to show how often a waveform repeats. A backlit screen, especially with white or adjustable lighting, keeps readings clear in dim labs or poorly lit workspaces. Faster refresh rates update waveforms smoothly, so you don’t miss sudden changes in PWM or I2C signals. Real users found these features cut confusion and improved accuracy when testing servos, sensors, or DIY robotics circuits-making learning faster and less frustrating.
Ease Of Use
While diving into electronics projects like Arduino-based robots or sensor arrays, you’ll want an oscilloscope that doesn’t slow you down with clunky menus or cryptic controls. Look for models with intuitive layouts and dedicated knobs for timebase and voltage adjustments-they make analyzing signals faster and more accurate. A color display of at least 2.8 inches, like 320×240 resolution, isn’t just sharper-it helps you see waveforms and menus clearly during testing. One-button operations for capturing, saving, or switching modes let you focus on building, not figuring out buttons. Built-in help, on-screen tips, and labeled keys cut your learning curve dramatically. Auto-setup features detect signals instantly and adjust settings for you, so you’re not guessing on trigger levels or coupling. You’ll get reliable results faster, even when debugging motor drivers or I2C buses, letting you learn by doing-without frustration.
Safety Features
A reliable oscilloscope doesn’t just measure signals-it protects you and your gear when things go sideways. You need overvoltage and overcurrent protection, like built-in fuses rated for 300V CAT II, to survive accidental spikes when probing motor drives or power supplies. Always check the input rating-look for clear labels, like 300V max-and high-voltage circuitry that won’t fry during real-world mistakes. Pick a model with isolated inputs or differential channels; they prevent shorts when testing grounded circuits, like an Arduino-powered robot arm tied to a mains-powered battery charger. Use 10x probe settings-they reduce voltage at the scope and boost safety-and guarantee probes carry safety certifications like UL 61010. Confirm reverse polarity protection and safeguard against miswired probes; testers praise models that shut down cleanly instead of blowing components. Safety isn’t optional-it’s what lets you learn fast without frying your first $50 board.
Upgrade Potential
When your projects grow from blinking LEDs to sensor arrays or motor controllers, you’ll want an oscilloscope that grows with you. Look for models with upgradable firmware so you can add new features without buying a new unit. Expandable record lengths let you capture longer waveforms, essential when debugging I2C or SPI buses in robotics projects. Choose scopes that support software-defined upgrades-these often enable FFT, serial decoding, or math functions with a simple update. Some let you activate extra bandwidth or channels via license keys, a huge plus when tackling faster microcontroller signals. Hardware add-ons, like differential probes or digital channels, boost versatility down the line. Always pick a scope with USB or PC connectivity; it makes firmware updates fast and keeps your tool compatible with evolving software tools, ensuring years of reliable, precise measurements.
Frequently Asked Questions
Can I Use an Oscilloscope Without a Computer?
yes, you can use an oscilloscope without a computer, and most standalone models work right out of the box, you just plug in the probe, power it on, and adjust the timebase, voltage scale, and trigger to see signals, many beginner scopes like the gear 3050 or the tektronix tbs1102c offer built-in screens, intuitive knobs, and buffer memory, so you capture waveforms instantly, no pc needed, they’re designed for hands-on learning, right at your bench.
Are Oscilloscopes Safe for Beginners to Handle?
Yes, you can safely use an oscilloscope as a beginner if you follow basic precautions. Always check voltage ratings before connecting probes, stick to low-voltage circuits under 30V, and use proper grounding. Modern digital scopes like the Rigol DS1054Z have built-in protection and clear menus, reducing errors. Real users report intuitive interfaces and stable performance, making them ideal for learning, measuring, and troubleshooting without risk when used correctly.
How Do I Calibrate an Oscilloscope at Home?
You calibrate your oscilloscope at home by running the built-in self-calibration, usually found in the utility menu-press it and wait 30 seconds. Most entry-level scopes, like the Rigol DS1054Z or Hantek DSO5072P, auto-adjust internal offsets. Before starting, let the unit warm up 15 minutes for stable readings. Use the probe’s compensation tool on the front terminal to tweak the square wave; if it’s flat, you’re calibrated and ready to test Arduino signals or I2C buses accurately.
What Probes Come With Beginner Oscilloscopes?
You get passive 10x voltage probes with most beginner oscilloscopes, and they’re perfect for learning, they handle everyday signals up to 100 MHz, they’re sturdy, color-coded, and include compensation adjustments, testers like how they reduce noise and scale 1V signals to 0.1V for safer readings, they work right out of the box with Arduino, Raspberry Pi, and motor driver circuits, and they’re calibrated to match your scope’s input, making signal capture accurate and hassle-free.
Do Oscilloscopes Require Special Power Outlets?
You don’t need special power outlets-most beginner oscilloscopes run on standard 110V AC, just like your phone charger. They’re plug-and-play with any wall outlet, and many models, like the Rigol DS1054Z, even work on 220V worldwide. Some, such as the Siglent SDS1104X-E, include universal power supplies, so you’re covered anywhere. Others, like the low-cost UNI-T UT210E, are battery-powered, giving you lab or field flexibility, which testers love for portable labs or robotics tinkering.