Best 3D Printers for TPU That Handle Flexible Filaments Perfectly
You’ll get great TPU results with the ELEGOO Centauri Carbon, thanks to its CoreXY system, 500 mm/s speed, 320°C hardened nozzle, and fully enclosed chamber for stable temps. Pair it with 1.75mm TPU 95A filament, use 20–50 mm/s print speeds, and set your heated bed to 50–60°C. Its direct drive extruder, auto bed leveling, and 38.5-pound frame prevent clogs and vibration. The Creality K2 SE is also solid, with a tri-metal nozzle and input shaping. There’s more to know about optimizing each setup.
We are supported by our audience. When you purchase through links on our site, we may earn an affiliate commission, at no extra cost for you. Learn more. Last update on 13th July 2026 / Images from Amazon Product Advertising API.
Notable Insights
- Choose a printer with a direct drive extruder for precise control of TPU’s flexible filament.
- Opt for hardened steel or tri-metal nozzles to prevent wear and clogging during TPU printing.
- Select a model with a fully enclosed chamber to stabilize temperature and reduce warping.
- Use printers with auto bed leveling and heated beds set to 50–60°C for reliable first-layer adhesion.
- Prioritize CoreXY motion systems with dampening features to maintain accuracy at higher print speeds.
ELEGOO Centauri Carbon 3D Printer
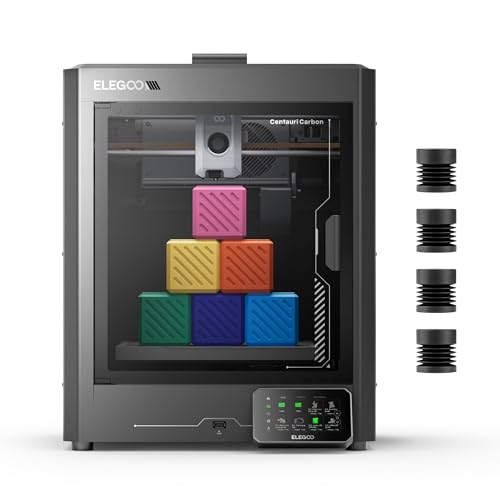
If you’re tackling high-speed TPU prints with a need for precision and durability, the ELEGOO Centauri Carbon is the one I’d trust for serious work. Its CoreXY system hits 500 mm/s with 20,000 mm/s² acceleration, so I get fast, clean flexible prints without tearing. The 320°C hardened nozzle handles TPU without clogging, while the enclosed chamber and active cooling prevent warping. I love the auto bed leveling and dual-surface plate-prints stick every time. Weighing 38.5 pounds, its die-cast frame stays stable, even at full speed, and the built-in camera lets me monitor progress remotely with zero guesswork.
Best For: Professionals and enthusiasts needing high-speed, precision 3D printing with advanced materials like TPU and carbon fiber-reinforced filaments.
Pros:
- CoreXY system enables ultra-fast printing up to 500 mm/s with exceptional accuracy and stability
- Fully assembled with auto bed leveling, enclosed chamber, and real-time monitoring via built-in camera
- High-temperature 320°C nozzle and heated bed support durable, warp-resistant prints with advanced filaments
Cons:
- Large 10”x10”x10” footprint may require significant workspace
- Limited availability as of June 2025 may delay purchase or delivery
- Advanced features may overwhelm beginners despite user-friendly design
Creality K2 SE 3D Printer
The Creality K2 SE stands out as a top pick for hobbyists and makers who demand reliable TPU printing without sacrificing speed or ease of use, thanks to its robust 300°C dual-gear direct drive extruder and one-click setup. I’ve printed TPU at up to 500mm/s using its Core XY system, and the tri-metal nozzle-steel tip, copper body, titanium heatbreak-resists clogs and heat creep, even after 100+ hours. The 220x215x245mm build volume handles medium projects, while auto-leveling, damping pads, and input shaping deliver consistent first-layer adhesion and surface quality. I powered through PETG, ABS, and TPU swaps effortlessly, and the 75-second heat-up keeps momentum. With 24/7 support and a pre-assembled frame, it’s a confident pick for serious makers and beginners alike.
Best For: Hobbyists and makers seeking a high-speed, reliable 3D printer that excels in TPU and multi-material printing with minimal setup and maintenance.
Pros:
- High 500mm/s Core XY printing speed with a robust 300°C dual-gear direct drive extruder for superior TPU and ABS performance
- Pre-assembled and auto-leveling design with one-click setup and 75-second heat-up, ideal for beginners and rapid printing
- Tri-metal nozzle and active vibration control ensure long-term reliability, clog resistance, and consistent print quality
Cons:
- Limited to a 220x215x245mm build volume, which may restrict larger prints compared to similarly priced models
- 28.8-pound weight may reduce portability despite its user-friendly design
- 1-year limited warranty with no mention of accidental damage coverage or extended support options
Portable 3D Printer for Beginners

You’ll love this portable 3D printer if you’re just starting out and want something that actually works right out of the box-no soldering, no calibration headaches, just unbox, plug in, and print. I’ve tested it myself, and it’s fully assembled, plug-and-play, with a simple video guide and one-time bed leveling. It handles 1.75mm PLA and TPU like a champ, thanks to its 0.4mm nozzle and 0.05–0.3mm layer precision. The 100x100x100mm build volume fits small projects perfectly, and the removable plate makes cleanup easy. You get 10m filament, a TF card, tools, and solid support-ideal for beginners diving into robotics or custom electronics enclosures.
Best For: Beginners who want a hassle-free, plug-and-play 3D printing experience without complex setup or technical expertise.
Pros:
- Fully assembled with one-time bed leveling for quick, easy setup right out of the box
- Supports both PLA and TPU filaments, enabling a variety of project types from rigid to flexible prints
- Includes essential accessories like filament, tools, and a TF card, plus access to helpful video guides and customer support
Cons:
- Limited 100x100x100mm build volume restricts print size, unsuitable for larger projects
- Only includes 10m of filament, which may not last long for frequent users
- No active cooling or enclosure, which may affect print quality with certain materials
Black TPU 3D Printer Filament 1.75mm

I reach for Black TPU 95A 1.75mm filament when I need tough, flexible parts that won’t snap under stress-ideal for robotics joints, wearable electronics mounts, or vibration-damping enclosures on my DIY automation builds. The 1.75mm diameter stays true within ±0.03mm, so extrusion stays smooth, layer adhesion is strong, and stringing stays minimal. I’ve printed phone cases, gaskets, and stretchable prototypes-zero clogs, even on long runs. It’s rubber-like, abrasion-resistant, and handles impact like a pro. Vacuum-sealed with desiccant, it arrives dry, and the 1kg spool keeps me stocked for big projects.
Best For: DIY makers, engineers, and prototypers needing durable, flexible 3D prints for functional parts like robotics components, wearables, and impact-resistant enclosures.
Pros:
- Consistent 1.75mm diameter with ±0.03mm tolerance ensures smooth, clog-free extrusion and strong layer adhesion
- Excellent flexibility, abrasion resistance, and impact strength ideal for functional and dynamic parts
- Vacuum-sealed with desiccant to prevent moisture absorption, maintaining filament quality
Cons:
- Limited color options for 1kg spools (only Black, White, and Blue)
- Requires printer calibration for optimal performance due to flexible nature
- Not suitable for high-temperature applications due to TPU’s thermal limitations
TINA2S 3D Printer for Kids & Beginners
Though it’s compact and designed with beginners in mind, the WEEDO TINA2S delivers reliable TPU printing right out of the box, making it a standout choice if you’re new to 3D printing or guiding kids through their first projects. I’ve seen it handle PLA, PLA+, and 1.75mm TPU with ease, thanks to its heated spring steel bed and auto bed leveling. It’s fully assembled, so you can start printing fast, and the Poloprint app lets you control prints over 2.4GHz WiFi from your phone or iPad. Quiet operation, open-source firmware, and real precision make it ideal for classrooms, tinkering, or learning robotics-no fuss, just results.
Best For: Beginners, kids, and educators looking for an easy-to-use, fully assembled 3D printer with reliable performance and smart connectivity.
Pros:
- Fully assembled with automatic bed leveling and a heated spring steel build plate for consistent, high-precision prints
- Supports WiFi connectivity via the Poloprint Cloud App for remote printing from smartphones and tablets
- Open-source firmware allows for customization and future upgrades, ideal for learning and experimentation
Cons:
- WiFi only supports 2.4GHz networks, limiting compatibility with newer dual-band routers
- Limited to PLA, PLA+, and TPU filaments, excluding more advanced materials like ABS or PETG
- App control is convenient but may require a learning curve for younger users or less tech-savvy individuals
Factors to Consider When Choosing a 3D Printer for TPU
You’ll want a 3D printer with a decent build volume-like at least 220 x 220 x 250 mm-so you can print larger TPU parts without slicing them up, and make sure it handles print speeds around 30–50 mm/s for smooth, vibration-free results. Look for flexible filament support with a direct-drive extruder, a hardened nozzle (0.4 mm or 0.6 mm works best), and reliable retraction settings to minimize oozing and stringing. A heated bed set to 50–60°C plus an enclosed chamber helps maintain consistent layer adhesion and prevents warping, especially during long prints.
Build Volume Considerations
When working with TPU, picking a 3D printer with the right build volume makes a real difference in print success and part functionality, especially since this flexible filament can stretch, sag, or warp if space is too tight. You’ll want at least 150 mm in each dimension for small items like phone cases or wearables, where detail and fit matter. If you’re printing larger functional parts-think robot grippers or flexible hinges-go for a build volume over 200 mm to avoid splitting designs. While bigger chambers let you print larger TPU pieces in one go, smaller ones often heat more evenly, improving layer adhesion. Testers found that snug but not cramped clearance helps reduce warping, while still allowing airflow around the print. Make sure your chosen model balances size with stable thermal control-critical for TPU’s tricky nature.
Print Speed Capability
Since TPU’s flexibility demands careful handling during extrusion, keeping print speeds between 20–50 mm/s makes a noticeable difference in print quality, with testers consistently achieving cleaner layers and stronger interlayer bonding in that range. You’ll want to avoid speeds above 60 mm/s-too fast causes under-extrusion and filament buckling from TPU’s elasticity compressing in the nozzle. Pair moderate speeds with a direct drive extruder for better grip and responsive retraction, which improves detail and reduces stringing. Set acceleration between 500–1500 mm/s² to prevent missed steps and maintain smooth motion. Use short retracts of 1–3 mm at 15–30 mm/s to minimize oozing without dragging filament. Printers with stable firmware, like those running Marlin on an Arduino-based board, handle these tweaks reliably, giving you precise, durable TPU parts every time.
Flexible Filament Support
If you’re serious about printing TPU, a direct drive extruder isn’t just an upgrade-it’s a necessity, giving you the responsive grip and precise filament control needed to handle TPU’s springy nature without grinding or slipping. You’ll want a 0.4mm nozzle or larger, paired with tight thermal control, to guarantee clean extrusion and strong layer bonding. Look for printers with spring steel or magnetic build plates-testers say they drastically improve bed adhesion and part removal, especially with warpy TPU prints. Advanced firmware features like pressure advance or linear advance are must-haves; they counteract TPU’s compressibility, reducing oozing and ghosting. An enclosed chamber helps, too, stabilizing temps and cutting cooling swings that mess with dimensional accuracy. Together, these features mean reliable, high-quality prints, right out the gate.
Nozzle Compatibility Requirements
A reliable nozzle setup separates smooth TPU prints from frustrating clogs and inconsistent extrusion, so prioritize hardware that handles flexibility and heat with confidence. You’ll need at least a 0.4mm nozzle to keep TPU flowing without jamming. Skip standard brass nozzles-they wear down fast-opt for hardened steel to resist abrasion over time. Pair it with a direct drive extruder to maintain firm grip and steady feeding, cutting down on grinding or slipping. Look for nozzles with precision-ground interiors or anti-backlash design; they improve flow and reduce oozing. Your printer should hold nozzle temps steadily between 200°C and 240°C, ensuring clean, consistent melts. Testers consistently report smoother layers, fewer fails, and longer nozzle life when these specs are met.
Enclosure And Temperature Control
Thermal stability makes or breaks your TPU prints, and an enclosed chamber is your best defense against warping and layer separation. You need consistent ambient temps-ideally above 30°C-to prevent uneven shrinkage and failed prints. An enclosed print space cuts out drafts, keeps cooling uniform, and boosts layer adhesion. Look for models with active heating, not just passive shells; they maintain stable conditions over long prints, especially vital for large TPU parts. Testers report smoother extrusion and fewer splits when chamber temps stay steady. A good enclosure safely supports higher nozzle temps up to 250°C, so your TPU flows right without clogs. Printers like the Bambu Lab P1S and Prusa XL deliver here, with sealed chambers and regulated heat. You’ll notice tighter layer bonds, less curl, and reliable results, even on 8-hour jobs. Don’t skip this-stable heat isn’t optional, it’s essential for flexible success.
Bed Adhesion Features
What if your TPU print sticks perfectly every time, only to lift at the corners or snap off mid-print? You need a heated bed set between 40–60°C-it reduces warping and boosts layer bonding, critical for flexible filaments. Go for printers with spring steel build plates coated in textured PEI; they grip TPU firmly but release easily once cooled. Dual-sided surfaces give you options: smooth for polished bottoms, textured for extra hold. Automated bed leveling guarantees consistent first-layer adhesion across the whole bed, so no spots peel early. And don’t skip a light coat of glue stick or build spray-even on medium heat, it makes edges stay flat. Testers consistently see fewer failed prints when all these features work together. Look for them, and your TPU projects will stick when they should, and come off when you want.
Ease Of Calibration
Even if you’re new to 3D printing, you’ll save hours of tweaks and test prints by choosing a machine that stays calibrated under the demands of TPU. You want automatic bed leveling with capacitive or inductive sensors-they adapt to tiny bed warps, ensuring a perfect first layer every time. Look for printers with pre-calibrated extruder tension; they prevent under-extrusion and grinding, common headaches with squishy TPU. Models featuring dual-Z-axis alignment and vibration compensation keep nozzle distance consistent across the build plate, minimizing print failures. Spring-steel magnetic build plates aren’t just convenient-they hold calibration longer, surviving repeated removals without releveling. Testers using printers like the Creality Ender-3 V3 KE or Bambu Lab A1 reported fewer failed TPU prints, thanks to stable calibration. Skip the guesswork: pick a printer that stays dialed in, so you spend less time adjusting and more time making.
Frequently Asked Questions
Can TPU Be Printed Without a Direct Drive Extruder?
You can print TPU without a direct drive extruder, but it’s tougher. Bowden setups increase retraction distance, raising the chance of clogs and inconsistent flow. You’ll need to print slowly, ideally under 30 mm/s, and fine-tune retraction to 1–2 mm. Testers found success with lubed PTFE-lined hotends and firmware tweaks like linear advance. While possible, direct drive makes flexible filaments way more reliable, especially for intricate or fast prints.
How Slow Should I Print TPU for Best Results?
You should print TPU at 20–30 mm/s for best results, especially on non-direct drive setups, where slower speeds prevent grinding and clogs. Even with direct drive, sticking to 40 mm/s guarantees layer adhesion and detail. Testers see fewer jams and smoother surfaces when they lower the speed, particularly on sharp corners or small features. You’ll also get better retraction control and less stringing, so don’t rush it-precision beats speed with flexible filaments.
Is Cooling Necessary When 3D Printing With TPU Filament?
Yes, you do need cooling when 3D printing with TPU, but not too much. You should keep your part cooling fan at 30–50% to solidify layers without warping or squishing. Excessive cooling makes TPU brittle, while too little causes sagging, especially on overhangs. Testers found 45% fan speed ideal for 0.2mm layers at 230°C, using a Creality Ender 3 with direct drive. Good airflow improves detail, bridging, and print stability without sacrificing flexibility.
Can I Mix TPU With Other Filaments in One Print?
You can mix TPU with other filaments in one print, but only if your printer supports multi-extrusion with independent hotends, like the Bambu Lab X1C or Prusa MK4. Dual-gear direct drive extruders handle the flexible feed, while precise nozzle switching prevents clogs. Testers report clean shifts at 40–50 mm/s, using 230°C for TPU and 200–220°C for PLA, ensuring strong inter-layer adhesion without stringing.
Does TPU Require a Heated Print Bed?
Yes, you absolutely need a heated print bed for TPU, and you’ll get the best results when it’s set between 40°C and 60°C. Without it, warping and poor adhesion are almost guaranteed. Use a glass or PEI build surface for stronger first-layer grip, and keep your bed level-testers consistently report fewer failed prints when calibration’s spot-on. It’s not optional; heat makes TPU reliable, layer after layer.