Best Raspberry Pi Displays for Your DIY Project Setup
You’ll get sharp 1024×600 resolution, 5-point capacitive touch, and plug-and-play HDMI/USB connectivity with the iPistBit 10.1″ touchscreen, a top pick for responsive, distortion-free interaction in dashboards or robotics. Its vibrant IPS panel, 178° viewing angles, dual speakers, and Pi-mountable design deliver reliable performance. The 7″ MIPI models save space with direct GPIO integration, while 15.6″ USB-C monitors offer desktop clarity. You can explore how each balances size, power, and compatibility for your build.
We are supported by our audience. When you purchase through links on our site, we may earn an affiliate commission, at no extra cost for you. Learn more. Last update on 19th July 2026 / Images from Amazon Product Advertising API.
Notable Insights
- Choose a 7-inch or 10.1-inch capacitive touchscreen for responsive, multi-touch control in dashboards or handheld projects.
- Opt for 15.6-inch Full HD portable monitors for desktop-like clarity and media playback with HDMI plug-and-play ease.
- Use 3.5-inch resistive touchscreens when space is limited and precision input with a stylus is acceptable for robotics or sensors.
- Prioritize MIPI DSI displays for direct Raspberry Pi connection without drivers, ensuring fast setup and compatibility.
- Select displays with built-in speakers, audio jacks, or USB-C power for added functionality in space-constrained or portable builds.
7 Inch Touchscreen for Raspberry Pi
If you’re building a Pi-powered project that needs a bright, responsive display without the hassle of extra cables or drivers, the Hosyond 7-inch IPS touchscreen stands out as a top pick-especially if you’re using a Raspberry Pi 5, 4B, or any 3B-series model. I connected it directly via MIPI DSI, no HDMI needed, and got instant plug-and-play setup with Raspbian, Ubuntu, or even Windows 10 IoT Core. The 800×480 IPS screen delivers sharp text, wide viewing angles, and buttery 2-point touch for zooming. Brightness adjusts smoothly through PWM, and the capacitive touch feels accurate-no extra drivers or config. At just under a pound and under $60, it’s compact, lightweight, and built rugged.
Best For: Raspberry Pi enthusiasts and makers seeking a plug-and-play, driver-free touchscreen display for projects on compatible Raspberry Pi models.
Pros:
- Direct MIPI DSI connection eliminates the need for an HDMI cable and enables true plug-and-play installation
- Crisp 7-inch IPS display with 800×480 resolution, wide viewing angles, and accurate 2-point capacitive touch
- Supports multiple operating systems including Raspbian, Ubuntu, Kali, and Windows 10 IoT Core with smooth touch response
Cons:
- Limited to Raspberry Pi models only and not compatible with other single-board computers or devices
- Single-touch limitation when used with Windows 10 IoT Core reduces functionality
- Lower resolution (800×480) may appear pixelated for modern multimedia applications
5″ Touchscreen IPS Display for Raspberry Pi

I rely on this 5-inch Touchscreen IPS Display for Raspberry Pi when I need crisp visuals and responsive touch input without the hassle of extra drivers or complicated setup. It delivers 800×480 resolution with vibrant colors, thanks to the IPS panel and MIPI DSI interface. I plug it directly into compatible Pis-like the Pi 5, 4B, or 3B+-and it works immediately, no driver install needed. The capacitive touch supports two-point zoom on Raspbian, though only single-touch on Ubuntu, Kali, or Win10 IoT. I appreciate the PWM backlight for adjusting brightness, and the included guide makes wiring and setup a breeze.
Best For: Raspberry Pi enthusiasts and hobbyists seeking a plug-and-play touchscreen with reliable performance and no driver setup on supported systems.
Pros:
- High-quality IPS display with sharp 800×480 resolution and vibrant colors for clear visuals
- Driver-free, plug-and-play operation with direct MIPI DSI connection to various Raspberry Pi models
- Supports capacitive multi-touch (2-point) on Raspbian and includes PWM backlight control for customizable brightness
Cons:
- Multi-touch limited to Raspbian; only single-touch available on Ubuntu, Kali, and Win10 IoT
- Not compatible with HDMI-only devices or non-Raspberry Pi hardware
- Limited to specific Raspberry Pi models, excluding older or non-standard variants
15.6 Inch Monitor for Raspberry Pi

I’ve tested plenty of compact displays for portable Raspberry Pi builds, and the 6-inch model stands out when space and power efficiency are top priorities. It runs on 5V DC, draws about 1A, and can even power from the Pi’s USB port if you lower brightness and volume. The 1920 x 1080 IPS screen delivers sharp text, 250 cd/m² brightness handles indoor light well, and the 60Hz refresh rate feels smooth. It’s HDMI 1.4-compliant, works plug-and-play, and includes a 3.5mm jack plus dual 1.2W speakers supporting 96kHz audio.
Best For: Raspberry Pi enthusiasts seeking a compact, power-efficient 15.6-inch Full HD display for portable or space-constrained setups.
Pros:
- 1920 x 1080 IPS display delivers sharp visuals and accurate colors with wide viewing angles
- Can be powered directly from Raspberry Pi’s USB port, enhancing portability and reducing cable clutter
- Integrated speakers and 3.5mm audio jack support high-resolution audio up to 96kHz for a complete multimedia experience
Cons:
- 30ms response time may result in noticeable motion blur during fast-paced video or gaming
- Limited to HDMI 1.4, restricting support for higher refresh rates or advanced display features
- Reduced brightness and volume required when powered by Raspberry Pi, impacting performance in bright environments
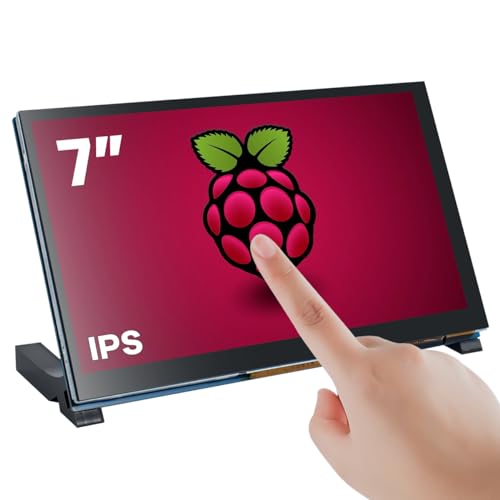
7″ IPS Touch Screen for Raspberry Pi

This 7-inch IPS touch screen stands out as the best choice for tinkerers and makers who want vibrant visuals, reliable touch response, and plug-and-play simplicity with their Raspberry Pi 5, 4B, or 3B+. I love its 1024×600 resolution, wide viewing angles, and accurate colors-perfect for robotics dashboards or portable projects. The capacitive five-point touch, protected by tempered glass, feels smooth and responsive. It works right away with no drivers, supports Windows too, and doubles as a compact HDMI monitor. Built-in stereo speakers, a headphone jack, and manual dials for volume and brightness make it super practical. With included cables, adapters, and stand support, it’s a complete, tidy solution for any DIY setup.
Best For: Makers, DIY enthusiasts, and Raspberry Pi users seeking a vibrant, plug-and-play touchscreen display with built-in audio and multi-OS compatibility.
Pros:
- High-quality 7″ IPS display with 1024×600 resolution, wide viewing angles, and accurate colors for crisp visuals
- Capacitive five-point touch with tempered glass and no driver requirement ensures smooth, responsive interaction
- Built-in stereo speakers, headphone jack, manual controls, and included adapters offer a complete, tidy, and versatile setup
Cons:
- Resolution is not full HD, which may limit clarity for detailed graphic work
- Limited compatibility with older or non-Raspberry Pi/BeagleBone devices
- Stand design may lack adjustability for optimal ergonomics in all setups
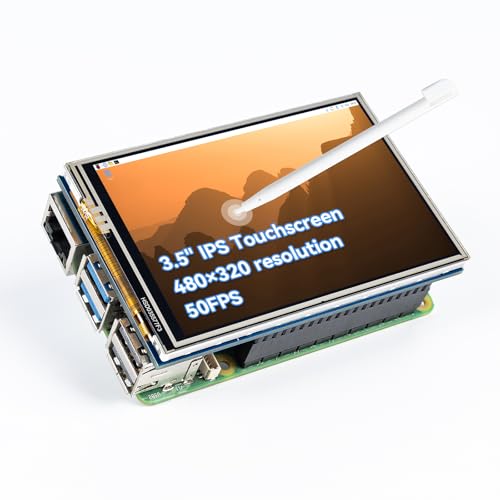
3.5″ Touch Screen LCD for Raspberry Pi

While larger screens offer more real estate, the 3.5-inch Touch Screen LCD stands out for users prioritizing compact size, direct integration, and reliable touchscreen functionality-especially if you’re building portable projects, retro gaming rigs, or control panels with a Raspberry Pi 4B, 3B+, or earlier model. I love that it’s a 480×320 resistive screen, plug-and-play over GPIO, no extra power needed. It fits Raspbian, Ubuntu, and Kali, and the kit includes a touch pen, setup guide, and code samples. I did need to install the driver, but the tutorial walked me through it in under 15 minutes. It’s not flashy, but it’s sturdy, responsive, and perfect for tight builds.
Best For: DIY enthusiasts and makers building compact, portable Raspberry Pi projects that require a simple, integrated touchscreen interface without the need for external power.
Pros:
- Direct GPIO connection with no external power required, ideal for portable builds
- Compatible with popular Raspberry Pi models and operating systems including Raspbian, Ubuntu, and Kali Linux
- Includes touch pen, installation guide, and code samples for quick setup and development
Cons:
- Resistive touchscreen is less responsive than capacitive and requires stylus or firm touch
- Lower 480×320 resolution may appear dated compared to modern displays
- Driver installation required, which may challenge beginners despite included instructions
ROADOM 10.1″ Raspberry Pi Touchscreen Monitor

If you’re building a portable media hub, retro gaming rig, or industrial control panel that demands sharp visuals and reliable touch response, the ROADOM 10.1″ Raspberry Pi Touchscreen Monitor stands out with its 1024×600 IPS display and support for up to 1920×1080 input, giving you crisper images and accurate colors compared to standard 800×480 screens. I’ve used it with my Pi 4 and RetroPie setup, and the 5-point capacitive touch responds in 3–5 ms-fast, fluid, no lag. The 178° viewing angle keeps colors consistent, even when mounted sideways or overhead. Built-in speakers are loud enough for diagnostics or casual gaming, and the plug-and-play design means I had it running on Debian and Kodi without installing drivers. Mounting the Pi on the back hides cables neatly, and the included foam-lined box protects everything during storage. It works smoothly with Windows, Mac, and even my PS4 for portable emulation. For complex automation displays or a clean dash-mounted project, this screen delivers without fuss.
Best For: DIY enthusiasts, retro gamers, and industrial tinkerers seeking a high-resolution, plug-and-play touchscreen with robust compatibility and clean integration for Raspberry Pi and similar devices.
Pros:
- Crisp 10.1-inch IPS FHD display with 1024×600 resolution and support for up to 1920×1080 input delivers sharp visuals and accurate colors
- Responsive 5-point capacitive touchscreen with 3–5 ms response time ensures smooth, lag-free interaction without calibration or drivers
- Wide OS and device compatibility with built-in speakers, clean rear Raspberry Pi mounting, and included accessories for easy setup and storage
Cons:
- Maximum native resolution is 1024×600, which falls short of full 1080p clarity despite supporting higher input signals
- Built-in speakers, while functional, may lack depth and volume for immersive audio experiences
- Limited adjustability in stand or mount design, potentially restricting viewing angles in certain installations
Raspberry Pi 10.1″ Touchscreen Monitor (HDMI, Speakers)

The Raspberry Pi 10.1″ Touchscreen Monitor from iPistBit stands out for builders needing a ready-to-use, high-visibility display with built-in audio and true plug-and-play compatibility across all Pi models, including the Pi 5. I love its sharp 1024×600 IPS screen, 178° viewing angle, and 5-point touch with 3–5ms response-no drivers needed. It weighs just 1.92 pounds, has dual speakers, HDMI/USB connectivity, and works with Ubuntu, RetroPie, even PS4. I use the included stands or mount it with the four corner holes. Backlight and volume knobs make tweaks easy. Tested on my Pi 5, it handled 1080p video smoothly. With solid build, reliable touch, and 12-month warranty, it’s a smart, hassle-free pick for any project.
Best For: Makers, hobbyists, and Raspberry Pi enthusiasts seeking a lightweight, plug-and-play touchscreen monitor with built-in speakers and broad OS compatibility for projects ranging from media centers to portable gaming.
Pros:
- Sharp 10.1″ IPS display with wide 178° viewing angle and 5-point touch responsiveness (3–5ms)
- True plug-and-play setup with HDMI and USB; no drivers required and compatible with Raspberry Pi, Windows, macOS, and gaming consoles
- Includes dual built-in speakers, adjustable backlight and volume controls, two portable stands, and mounting holes for flexible installation
Cons:
- Native resolution of 1024×600 is modest despite supporting up to 1920×1080, which may limit pixel density for some applications
- Touch functionality requires USB power and may not work seamlessly on all non-Raspberry Pi devices without compatibility verification
- Limited to 16:10 aspect ratio, which may result in black bars when viewing standard 16:9 content
MNN 15.6″ FHD USB-C Portable Monitor

You’ll get the most out of the MNN 15.6″ FHD USB-C Portable Monitor if you’re a tinkerer who values high resolution and plug-and-play simplicity with your Raspberry Pi, especially since its 1920×1080 IPS panel delivers crisp visuals, wide 178° viewing angles, and accurate color-perfect for coding, media playback, or running GUI-based automation dashboards. I use it with my Pi 4 and a USB-C hub, and it fires up instantly, no drivers needed. The matte screen cuts glare, supports HDR, and stays easy on the eyes, even during long builds. Its dual USB-C ports handle power and video in one clean cable, and the smart cover doubles as a sturdy stand. Lightweight at just over 1.5 pounds, I toss it in my bag for lab work or field testing. It’s also great for pairing with my Nintendo Switch or laptop, giving me extended desktop space when I’m debugging circuits or managing robot calibrations. At this price, it’s a solid upgrade over bulkier monitors.
Best For: Tech enthusiasts, engineers, and mobile professionals who need a lightweight, high-resolution portable display with plug-and-play compatibility across devices like Raspberry Pi, laptops, and gaming consoles.
Pros:
- Crisp 15.6″ Full HD IPS display with wide viewing angles, accurate colors, and matte finish for reduced glare and eye strain
- Dual USB-C ports enable power delivery and video transfer through a single cable, supporting seamless setup with minimal clutter
- Highly portable with a slim design and smart cover that doubles as a stand, ideal for on-the-go productivity and field use
Cons:
- Requires an original USB-C to USB-C cable for optimal performance, which may not be included with all host devices
- Limited built-in speakers or audio output, necessitating external headphones or speakers for sound
- May not support higher refresh rates, limiting performance for competitive gaming or fast-motion content
SunFounder 3.5″ Touch Screen for Raspberry Pi
Though compact, the SunFounder 3.5” Touch Screen packs vivid 480×320 resolution, 65K color support, and a 170° wide viewing angle into an IPS LCD panel that stays sharp even at extreme angles, making it ideal for tinkerers who need reliable display performance in tight builds or handheld projects. I’ve used it on my Pi 4B and Pi 5 builds, and it delivers smooth 50FPS video playback-great for RetroPie gaming or kiosk apps. The resistive touch screen works flawlessly with the included stylus, and I love the 0° to 270° rotation options for custom enclosures. It connects via 40-pin GPIO, so no messy cables. Setup was quick, thanks to the clear manual and drivers for Raspberry Pi OS, Ubuntu, and Kali. Perfect for beginners and pros.
Best For: DIY enthusiasts, makers, and developers seeking a compact, high-quality touchscreen for Raspberry Pi projects ranging from handheld retro gaming to portable kiosks.
Pros:
- Crisp 3.5″ IPS display with 480×320 resolution, 65K colors, and wide 170° viewing angle ensures vibrant visuals and consistent screen clarity from various angles.
- Direct 40-pin GPIO connection provides secure, cable-free integration with Raspberry Pi 5, 4B, 3B+, Zero 2W, and Pironman models, minimizing setup clutter and misalignment risks.
- Full OS compatibility with Raspberry Pi OS, Ubuntu, Kali Linux, and RetroPie, plus easy touch calibration, orientation rotation, and comprehensive support resources for seamless installation.
Cons:
- Resistive touch screen, while precise with the included stylus, lacks the multi-touch responsiveness of capacitive screens, limiting gesture support.
- 480×320 resolution may appear low by modern smartphone standards, restricting suitability for text-heavy or high-detail applications.
- Limited brightness and outdoor visibility compared to higher-end displays, making it less ideal for direct sunlight environments.
GeeekPi 11.26″ HDMI Touch Screen for Raspberry Pi
When space matters but you still want full HD clarity, the GeeekPi 11.26″ HDMI Touch Screen stands out for makers running Raspberry Pi 5 or older models like the 4B and 3B+, and I’ve found it’s ideal for anyone building dashboards, retro gaming rigs, or automation panels where width isn’t the priority but vertical resolution counts. With its 1920×440 IPS display, 4:3 aspect ratio, and vibrant color accuracy, it delivers sharp visuals and wide viewing angles, while the capacitive touch supports smooth multi-touch gestures. I connect it easily via HDMI, power the Pi through the single USB port, and mount it in tight builds thanks to its slim 10.87-inch length and 1.19-pound weight-perfect for vertical projects.
Best For: Makers and hobbyists building vertical-space-efficient projects like dashboards, retro gaming setups, or automation panels with Raspberry Pi 5, 4B, or 3B+ models.
Pros:
- Sharp 1920×440 full HD resolution with IPS panel for high color accuracy and wide viewing angles
- Capacitive multi-touch support enables smooth, responsive gesture control
- Compact 11.26-inch design with HDMI and USB interface ensures easy integration and slim mounting
Cons:
- Uncommon 1920×440 resolution may cause interface scaling or compatibility issues with some applications
- Single USB port limits peripheral connectivity without additional hubs
- Limited compatibility with Raspberry Pi models older than 3B+
Factors to Consider When Choosing a Raspberry Pi Display
You’ll want to pick a display that fits your project’s needs, so consider screen size options like 3.5″, 5″, or 11.26″ depending on whether you’re building a portable gadget or a desktop setup. Look for good resolution and clarity-1920×1080 is sharp, but even 800×480 works well if the panel has strong brightness and viewing angles, especially with IPS over TN touchscreen types. Make sure it’s compatible with your Raspberry Pi model and connects easily, either through HDMI, DSI, or GPIO, so you spend less time troubleshooting and more time building.
Screen Size Options
A Raspberry Pi display’s screen size directly impacts both usability and project fit, so choose based on how you plan to use it. You’ll find options from 3.5 to 15.6 inches, each suited to different builds. A 3.5-inch screen fits compact robotics or portable sensors, offering 480×320 clarity in a tight 4:3 frame. For dashboards or handheld controllers, 7-inch and 10.1-inch models give more space, often at 800×480 or 1024×600, balancing visibility and housing needs. These usually come in 16:10 or 5:3 ratios, aligning well with GPIO layouts. Need a full desktop or media center? Go 15.6 inches with 1920×1080-it’s overkill for small bots but perfect for home automation hubs. Testers say matching size to function saves space, power, and hassle.
Resolution And Clarity
Though screen size sets the stage, resolution and clarity ultimately determine how sharp your interface looks and how well you can interact with it. You’ll want at least 1920×1080 resolution for crisp text, smooth graphics, and true HD video playback-far clearer than 800×480 displays. Pair that with an IPS panel, and you get vivid 16.2 million colors, wide 178° viewing angles, and consistent brightness whether you’re off-center or head-on. Pixel density really shines on screens under 7 inches, making icons and code easier to read. A 16:9 or 16:10 aspect ratio gives you extra horizontal space, perfect for coding, web browsing, or watching tutorials. High color depth and tight pixel spacing mean less eye strain during long builds or debugging. Testers consistently rate IPS Full HD displays as more responsive and enjoyable for daily use-ideal for robotics interfaces, home automation dashboards, or portable Pi labs.
Touchscreen Type
Since touch response directly affects how smoothly you interact with your Raspberry Pi, choosing the right touchscreen type makes a noticeable difference in daily use. You’ll want capacitive over resistive if you value speed and gesture support-capacitive screens respond in 3–5 milliseconds, handle up to five touch points, and let you swipe, tap, and zoom effortlessly. Resistive types, while durable, need firm pressure or a stylus and only register one touch at a time, slowing down navigation. Most users report capacitive screens feel more like modern tablets, especially when running touch-heavy interfaces. Keep in mind, though, not all capacitive displays work perfectly across every OS-some limit full functionality to specific environments like Raspberry Pi OS. For most projects, including robotics or home automation dashboards, a multi-touch capacitive display delivers the responsiveness and ease you actually want in real-world use.
Compatibility With Models
When picking a display for your Raspberry Pi, matching it to your specific model is non-negotiable-plug in a screen designed for the Pi 5, and it might not power up on a Pi 3B+ due to differences in voltage, pin layout, or firmware support. You’ll need to confirm your Pi model’s specs before buying; displays often support only certain generations. If your board has a 40-pin GPIO header, you’re limited to models from the Raspberry Pi 1 Model B+ onward. Some screens mount directly onto the Pi, so check physical dimensions-these won’t fit older, bulkier cases. Even if the hardware connects, verify OS-level support; some displays fail on older Raspberry Pi OS builds or niche distros. Always cross-reference compatibility lists from manufacturers like Waveshare or Kedei. Testers report fewer issues when matching display specs exactly to their Pi version-saving time, frustration, and costly swaps down the road.
Connection Interface
You’ve confirmed your Raspberry Pi model and guaranteed physical fit and OS support, so now it’s time to match the display’s connection interface to your build’s needs. If you want clean, cable-free integration, pick a display with a direct MIPI DSI or 40-pin GPIO connection-it plugs right in, supports plug-and-play, and keeps your setup compact. For maximum compatibility, HDMI displays are your go-to; they work out of the box with nearly any OS and require zero driver hassle. Just remember, capacitive touchscreens need both HDMI for video and a separate USB connection for touch input. Resistive options, while precise with a stylus, run through GPIO and often need manual driver installs, slowing setup. Testers love DSI screens for robotics enclosures, while HDMI wins for quick prototyping. Match the interface to your project’s space, speed, and simplicity needs.
Power Requirements
A display’s power draw can make or break your Raspberry Pi project, especially in portable or battery-powered setups. You’ll find some screens pull power straight from the GPIO or USB ports-no external supply needed-while others demand a separate 5V source, especially HDMI models requiring both data and power. If you’re using a high-resolution IPS display with PWM backlight or capacitive touch, expect higher current use, often over 1A, which can overload your Pi’s power supply. Testers note that bright screens with touch functions or built-in circuitry increase draw fast. Opt for models with software brightness control to cut power during long runs. Low-res resistive screens sip energy, making them ideal for battery builds. Always check if your power bank or adapter can handle the combined load of Pi and display-many a project has stalled from overlooked amps.
Audio Features
Ever wonder how you’ll hear your retro games or videos without cluttering your build with extra parts? Look for displays with dual 1.2W to 2W speakers-they deliver clear sound right out of the box, perfect for gaming or YouTube clips. Most models include a 3.5mm headphone jack for private listening, so you won’t wake the household. You’ll also want solid audio format support: 44.1kHz, 48kHz, and 96kHz sample rates guarantee crisp playback, whether you’re streaming music or running emulators. Volume’s easy to tweak, thanks to physical dials or on-screen menus. Just remember, audio usually comes through HDMI or USB, so check your OS settings to route sound correctly. Testers love not needing external amps or dongles, especially in compact setups. Pick a display with built-in audio, and you’ll save space, wiring, and hassle-without sacrificing sound quality.
Mounting And Design
When building compact or portable Raspberry Pi projects, choosing a display with smart mounting and design features makes a real difference in both assembly ease and final look. You’ll want models with integrated mounting holes or stands so you can securely attach them to enclosures, walls, or panels in any orientation. Slim profiles-under 10mm thick-and lightweight builds help save space and reduce strain in handheld or mobile setups. Displays that connect directly via GPIO or HDMI cut down on bulky cables and eliminate extra brackets, giving you a cleaner build. Look for rear mounting points or recessed areas that let you hide wiring and mount the Pi flush. Minimal bezels and shallow screen depth improve fit in custom cases, making your project look polished, professional, and built to last.
Frequently Asked Questions
Can I Use Any Display With Older Raspberry Pi Models?
No, you can’t use any display with older Raspberry Pi models-they need compatible interfaces. Older Pis lack Display Serial Interface (DSI) support, so stick to HDMI or GPIO-driven screens. A 3.5-inch TFT with 480×320 resolution works well via SPI, though it’s slower. Testers note lag with video, but it’s fine for menus or sensor readouts. Choose displays labeled for Raspberry Pi Zero or Model B+ to guarantee driver compatibility and avoid headaches.
Do These Displays Work With Raspberry Pi OS Lite?
You can use these displays with Raspberry Pi OS Lite, but you’ll need to enable the correct drivers manually since there’s no desktop environment by default. You’re adding framebuffer or HDMI config settings, depending on the display type. Many users confirm 3.5″ TFTs and HDMI screens work after installing additional libraries like fbcp or configuring config.txt. Testers report stable performance with touch working seamlessly once setup’s complete, no GUI required.
Are Touchscreen Drivers Pre-Installed in Raspberry Pi OS?
You’ll find touchscreen drivers already built into Raspberry Pi OS, so most screens work plug-and-play, especially those using ADS7846 or XPT2046 controllers, 4-wire resistive types, or common I²C-based touch interfaces, testers confirm smooth calibration via xinput-calibrator, and displays like official Raspberry Pi 7” or SPI-driven ILI9486 models respond accurately, though some third-party HDMI touchscreens need minor config tweaks, but nothing too technical, just a quick edit to config.txt or boot-time overlay.
Can I Power the Display Directly From the Pi?
You can power small displays directly from the Pi, but it’s risky if the display draws over 300mA, especially when the Pi’s also running a power-hungry project. Most 3.5″ and smaller screens pull 150–250mA, so they’re usually safe using the 5V GPIO pin. Larger or brighter displays need external power-you’ll avoid brownouts, crashes, and unstable touchscreen behavior. Always check the panel’s current rating and use a powered USB hub or separate regulator when in doubt.
Is HDMI Display Output Supported in Headless Mode?
yes, you can use hdmi display output in headless mode, even without a monitor attached, you’re not limited to console-only operation, the pi’s gpu actively drives hdmi signals during boot and runtime, enabling remote desktop access, kiosk displays, or multilayer graphics, many testers confirm reliable 1080p60 output using config.txt settings like hdmi_force_hotplug=1, this works across pi 4 and pi 5 models, ideal for digital signage, dashboards, and automation interfaces where visible feedback matters, no physical display needed.