Best Arduino Display Projects That Light Up Any Creation
You’ll light up any project with the right Arduino display, whether it’s the 0.96″ OLED’s 128×64 resolution, 0.04W draw, and I2C simplicity or the 16×2 LCD keypad shield’s plug-and-play usability on Uno boards. For vivid color and touch, the 4.0″ TFT delivers 480×320 graphics over SPI, while the GIGA Display Shield offers 480×800 clarity, IMU, and five-point touch. Pick based on power, interface, and space-every build gains instant polish. Explore the best fit for your next step.
We are supported by our audience. When you purchase through links on our site, we may earn an affiliate commission, at no extra cost for you. Learn more. Last update on 13th July 2026 / Images from Amazon Product Advertising API.
Notable Insights
- Use 0.96″ OLED displays for compact, high-contrast projects with low power needs and vibrant yellow-blue visuals.
- Build interactive dashboards with 4.0″ TFT touchscreens offering vivid 65K+ colors and responsive SPI-based performance.
- Create portable Arduino gadgets using ultra-efficient SSD1306 OLED modules that operate on 3.3V–5V with minimal power draw.
- Develop user-friendly interfaces with 16×2 or 20×4 I2C LCDs for simple data monitoring and easy keypad integration.
- Enhance wearables or small enclosures with self-luminous OLEDs that provide wide viewing angles and true blacks for readability.
5 Pcs 0.96″ OLED Display Module for Arduino

If you’re into compact, high-contrast displays for microcontroller projects, these 5 Pcs 0.96″ OLED modules are a solid pick, especially if you’re working with Arduino, Raspberry Pi, or STM32 boards. I use the Hosyond ones-they’re 1.09 x 1.07 inches, weigh just 1.44 ounces, and pack a 128×64 pixel SSD1306 screen with >160° visibility. They run on 3.3V–5V, draw only 0.04W normally, and don’t need a backlight. The I2C interface uses two pins, freeing up I/O. Text is crisp, even in small fonts, and since they’re self-luminous, contrast stays sharp. I generate custom fonts with free software-no built-in ones, but that’s a small trade-off.
Best For: Hobbyists and engineers working on compact microcontroller projects with Arduino, Raspberry Pi, or STM32 who need a small, low-power, high-contrast display.
Pros:
- Ultra-high contrast and self-luminous OLED display ensures crisp text and sharp visibility even at small font sizes
- Low power consumption (0.04W normal operation) and wide voltage support (3.3V–5V) make it energy-efficient and versatile
- I2C interface requires only two I/O pins, simplifying wiring and conserving microcontroller resources
Cons:
- No built-in fonts, requiring users to generate custom fonts using external software
- Very small screen size (0.96 inch) may limit readability for some applications
- Fragile physical design and lack of backlight adjustability could be drawbacks in certain environments
3pcs I2C 2004 LCD Module for Arduino

I’ve found the 3pcs I2C 2004 LCD Module pack to be a solid choice for makers and students diving into Arduino display projects, especially those building IoT systems or classroom electronics. Each module uses a 20×4 character format with a bright blue backlight, clearly showing letters, numbers, or sensor data like temperature and real-time clock readings. The I2C interface simplifies wiring-just connect GND, VCC, SDA to A4, and SCL to A5-and the default address is 0x27. It runs on 5V, works with Arduino, Raspberry Pi, and other boards, and includes a built-in potentiometer to adjust screen brightness. I’ve seen it thrive in DIY automation builds and student prototypes, where reliability and ease matter most.
Best For: Makers, students, and hobbyists working on Arduino or Raspberry Pi projects requiring simple, readable displays for IoT or educational electronics.
Pros:
- Simplified I2C interface reduces wiring complexity with only four connections needed
- Built-in potentiometer allows easy adjustment of display brightness
- Compatible with a wide range of development boards including Arduino, Raspberry Pi, and STM32
Cons:
- Limited to 5V operation, which may require logic level shifting for 3.3V boards
- Blue backlight may cause glare or readability issues in bright ambient light
- Default I2C address (0x27) may conflict with other I2C devices requiring address changes
ELEGOO UNO Project Super Starter Kit
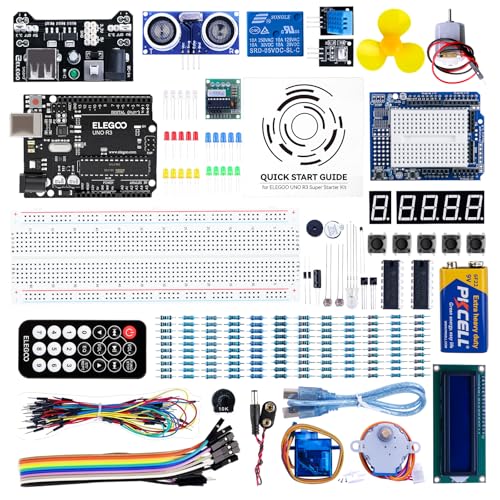
The ELEGOO UNO Project Super Starter Kit is my top pick for beginners diving into Arduino display projects, thanks to its plug-and-play LCD1602 module, pre-soldered pin headers, and extensive tutorial support. I love how it includes a high-quality UNO R3 board, a 9V battery pack, and a power supply module-everything you need to start fast. Its 22+ lesson PDF guide walks you through each circuit, no soldering needed. At 8.3 x 5.5 x 1.97 inches and just 1.2 pounds, it’s compact but complete, and it’s still available, so you won’t struggle to find one.
Best For: Beginners and students looking for an easy-to-use, comprehensive Arduino starter kit with plug-and-play components and step-by-step learning resources.
Pros:
- Includes a pre-assembled LCD1602 module with pin headers, eliminating the need for soldering.
- Comes with a high-quality UNO R3 board, 9V battery pack, and power supply module for immediate, versatile use.
- Comprehensive 22+ lesson PDF tutorial ideal for self-paced learning and classroom instruction.
Cons:
- Requires 2 CR2 batteries (included) for certain components, which are less common and may need replacement.
- Limited to basic to intermediate projects, potentially requiring additional components for advanced builds.
- Plastic packaging, while organized, may not offer long-term durability for repeated handling.
UCTRONICS 0.96″ OLED Display for Arduino Pi
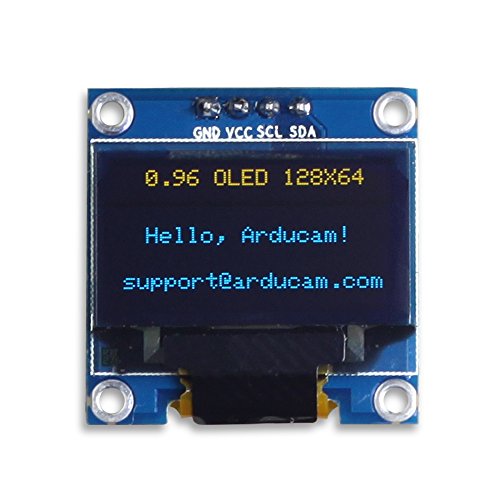
You’ll love the UCTRONICS 0.96″ OLED Display for Arduino Pi if you’re building compact, low-power projects that demand clear, sharp visuals-whether you’re running an Arduino UNO, Mega, or Raspberry Pi. I use it with my Uno, and the 128×64 resolution delivers crisp yellow and blue text at a wide 160° viewing angle. It runs on 3.3V–5V, pulls just 0.04W normally, and needs only two I/O pins thanks to I2C and the built-in SSD1306 driver. The display’s 15mm height fits tight spaces, and since it’s self-luminous, there’s no backlight clutter. I generated custom fonts using the provided tools-no built-in ones-but the library and support made it easy.
Best For: DIY electronics enthusiasts and makers working with Arduino, Raspberry Pi, or similar microcontrollers who need a compact, low-power display with vibrant visuals.
Pros:
- High 128×64 resolution in a tiny 0.96″ form factor delivers sharp yellow and blue visuals
- Ultra-low power consumption (0.04W typical) and self-luminous OLED design eliminate need for backlight
- Simple I2C interface with SSD1306 driver requires only two GPIO pins, easing integration with multiple platforms
Cons:
- No built-in fonts require users to generate custom fonts using external tools
- Limited to monochrome yellow and blue display, restricting color flexibility
- Small 15mm display height may challenge readability in certain applications
4.0″ TFT Touch Screen LCD for Arduino

While most hobbyists settle for smaller screens with limited interactivity, I’ve found the 4.0″ TFT Touch Screen LCD stands out as the best choice for makers who want rich visuals and responsive touch control without sacrificing compatibility or ease of setup. It delivers crisp 480×320 resolution with 65K colors, making menus and graphics pop, and the integrated touch layer responds accurately. It connects via SPI, using just a few pins, and works seamlessly with Arduino R3, Nano, or Mega2560. I love that it includes an SD card slot for loading images or data, and the included sample code plus ST7796S driver support speeds up prototyping.
Best For: Makers and hobbyists seeking a high-resolution, touch-enabled display for interactive Arduino projects with easy integration and expanded storage options.
Pros:
- Sharp 4.0-inch 480×320 display with 65K color depth delivers vibrant, detailed graphics
- Integrated touch screen and SPI interface allow for responsive user interaction with minimal pin usage
- Includes SD card slot and comprehensive software support for quick prototyping and media storage
Cons:
- Larger size may not fit compact or portable project enclosures
- Requires careful wiring and power management for stable performance
- Touch sensitivity may vary and require calibration in some setups
GeeekPi 2-Pack I2C 1602 LCD Display Module

A solid pick for makers who want clean wiring and reliable screen feedback, the GeeekPi 2-Pack I2C 1602 LCD Display Module delivers plug-and-play simplicity without sacrificing compatibility or control. I use it with my Arduino and Raspberry Pi projects, and the I2C interface saves precious pins-just four wires total. At 5V and 0x27 default address, it’s easy to set up, and the blue backlight looks sharp. The included potentiometer lets me fine-tune contrast and brightness, which works great in my IoT and home automation builds. Measuring 80mm x 35mm x 11mm, it fits snugly in compact enclosures. I’ve tested it with STM32 and Tinker Board too-no issues.
Best For: DIY makers and electronics enthusiasts seeking an easy-to-integrate, space-saving LCD solution for Raspberry Pi, Arduino, and other development board projects.
Pros:
- Utilizes I2C interface to reduce wiring and conserve I/O pins
- Compatible with a wide range of platforms including Arduino, Raspberry Pi, STM32, and Tinker Board
- Onboard potentiometer allows precise control of contrast and backlight brightness
Cons:
- Fixed I2C address (0x27) may cause conflicts in complex I2C setups
- Blue backlight, while visually appealing, may not suit all ambient lighting conditions
- Limited to 16×2 character display, restricting the amount of visible data
ESP32-S3 Touchscreen Module with IPS LCD

If you’re diving into smart, touch-driven Arduino display projects that demand real processing power and multimedia capabilities, the ESP32-S3 Touchscreen Module with IPS LCD stands out as my top pick. I love its dual-core 240MHz LX7 processor, 16MB flash, and built-in Wi-Fi/Bluetooth 4.2 for seamless connectivity. The 2.8-inch IPS LCD delivers crisp 240×320 resolution, 262K colors, and wide viewing angles, while the capacitive touch interface feels responsive. I’ve used the mic for AI voice projects, expanded storage via the TF slot, and powered it with a lithium battery-the onboard management keeps charging safe. It’s perfect for IoT, robotics, or any project needing audio, touch, and real smarts.
Best For: Makers and developers building advanced touch-enabled IoT or AI-driven Arduino projects requiring robust processing, multimedia support, and wireless connectivity.
Pros:
- Powerful dual-core 240MHz processor with 16MB flash enables smooth multitasking and complex applications
- High-quality 2.8-inch IPS display with capacitive touch and 262K color support for vivid graphics and responsive user interfaces
- Integrated microphone, speaker support, and battery management ideal for portable, voice-enabled, or audio-rich projects
Cons:
- Limited Bluetooth version (4.2) without support for newer Bluetooth 5.x features like extended range or higher data throughput
- 2.8-inch screen size may be restrictive for applications requiring larger displays or more detailed visual output
- Capacitive touch screen can be less responsive with gloves or low-pressure input compared to resistive touch alternatives
LCD 1602 Keypad Shield for Arduino (2-Pack)

You’ll want the LCD 1602 Keypad Shield for Arduino (2-Pack) if you’re building interactive projects that need real-time feedback and user input without the hassle of complex wiring. I use it for sensor monitoring and menu-driven controls, and it fits Uno R3, R4, and Mega boards perfectly-no breadboard or loose cables. The 16×2 display is bright, sharp, and readable in daylight or dim rooms. Built-in buttons (select, up, down, left, right) make navigation intuitive. Since it’s a 2-pack, I can test and deploy two setups at once. I followed the free “DIYables LCD Keypad Shield” tutorials-they gave me code examples and project ideas fast. It’s reliable, easy to code, and ideal for beginners and pros alike.
Best For: Hobbyists, students, and developers building interactive Arduino projects that require real-time display feedback and user input with minimal wiring.
Pros:
- Integrates a 16×2 LCD display and navigation keypad into a plug-and-play shield for fast, wire-free setup on Arduino Uno R3/R4 and Mega
- Comes in a 2-pack for simultaneous development or deployment across multiple projects
- Clear, high-contrast display with built-in buttons and access to free online tutorials with example code and project guidance
Cons:
- Limited to 16×2 character display, which restricts the amount of visible data or menu options
- Keypad button responsiveness may degrade over time due to mechanical wear
- Not compatible with non-R3/R4 Arduino boards without additional adaptors or modifications
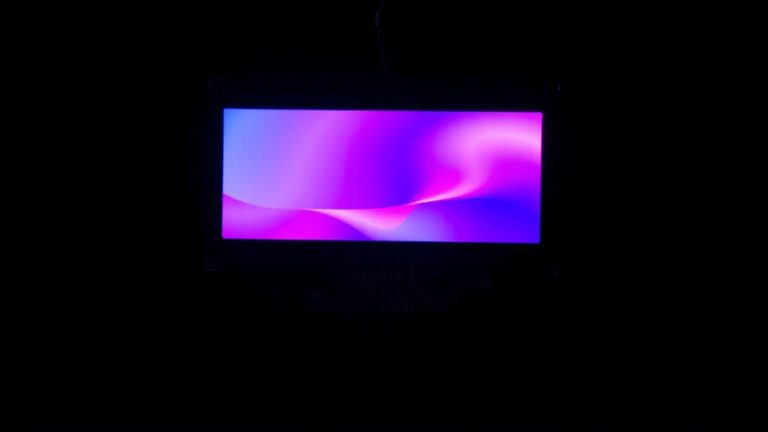
Arduino GIGA Display Shield (ASX00039)

When building advanced Arduino display projects that demand high-resolution visuals, responsive touch controls, and integrated sensing, the Arduino GIGA Display Shield (ASX00039) stands out-especially if you’re pairing it with the Arduino GIGA R1 WiFi. I love its 3.97” screen, sharp 480×800 resolution, and vibrant 16.7 million colors, all with five-point touch and gesture support. It’s got a built-in BMI270 6-axis IMU for motion tracking and a crisp MP34DT06JTR digital mic for audio capture. The Arducam connector expands vision capabilities, while 54 extra pins open room for growth. I run it on FreeRTOS, and with 802.11n wireless, my projects stay responsive, sleek, and ready for real-world use-all in a compact 2.76” frame.
Best For: Makers and developers building advanced, interactive Arduino projects requiring high-resolution touch display, motion sensing, and wireless connectivity.
Pros:
- High-resolution 3.97” 480×800 display with five-point touch and gesture recognition for rich user interaction
- Integrated 6-axis IMU (BMI270) and digital microphone (MP34DT06JTR) enable motion and audio-responsive applications
- Expansive connectivity with Arducam support and access to 54 additional pins for project customization
Cons:
- Compatible only with Arduino GIGA R1 WiFi, limiting use with other boards
- No built-in speaker or audio output, relying solely on the microphone for sound input
- Relatively short market availability since October 2023, with limited long-term user feedback
LCD 1602 Keypad Shield for Arduino

The LCD 1602 Keypad Shield is a rock-solid choice for makers building interactive Arduino projects that demand user input and real-time feedback, especially if I’m working with an Uno R3, Mega 2560, or Due. It fits snugly on my board and stacks cleanly with others, thanks to its shield design. The 16×2 blue-backlit display shows crisp white text, perfect for monitoring sensors or timers. I love the six-button keypad-Right, Up, Down, Left, Select, and Reset-giving me full control without extra wiring. I’ve used it for custom control panels, and it’s reliable, easy to code, and well-supported with free tutorials for DIYables users.
Best For: Makers and hobbyists building interactive Arduino projects requiring user input and real-time display feedback on compatible boards like Uno R3, Mega 2560, or Due.
Pros:
- Integrates a 16×2 blue-backlit LCD with clear white text for easy readability in dashboards, timers, and sensor monitoring
- Features a built-in six-button keypad (Right, Up, Down, Left, Select, Reset) for intuitive navigation without additional wiring
- Stackable shield design ensures compatibility with multiple Arduino boards and simplifies prototyping of control panels
Cons:
- Limited to 16×2 character display, which may restrict complex data visualization
- Keypad buttons are membrane-based and may lack tactile feedback over time
- Requires installation of specific libraries and basic coding knowledge for setup and customization
Factors to Consider When Choosing Arduino Display Projects
You’ll need to balance display resolution options like 128×64 on OLEDs or 320×240 on TFTs with your project’s clarity and detail needs. Check power supply requirements-some LCDs run on 3.3V, while certain TFTs draw over 100mA and need stable voltage regulators. Make sure your Arduino board supports the display’s interface, whether it’s I2C, SPI, or parallel, and don’t overlook color and contrast performance in sunlight, or how wide the viewing angle range is when mounting the screen off-center.
Display Resolution Options
Though you might be tempted to go for the sharpest screen available, matching display resolution to your project’s needs keeps performance smooth and power use in check, especially on resource-limited Arduino boards. You’ll find 128×64 OLEDs perfect for compact builds-clear enough for icons, text, and basic graphs without taxing an Uno. Need more detail? TFTs with 480×320 resolution handle color graphics, menus, and touch inputs with ease, ideal for interactive dashboards. High-end 480×800 displays deliver tablet-like sharpness, supporting multi-touch gestures and complex UIs, but require faster MCUs like the ESP32 or Teensy. Stick to 16×2 or 20×4 character LCDs for simple sensor readouts-they’re low-cost, easy to code, and light on memory. Remember, pixel density matters: a 1.3” 128×64 OLED stays crisp up close. Pick resolution based on content, not specs alone.
Power Supply Needs
Matching your display’s power needs to your project’s design keeps your Arduino running reliably, especially when moving beyond resolution choices like 128×64 OLEDs or 480×320 TFTs. You’re powering an I2C OLED? Great-it runs on 3.3V–5V and sips just 0.04W, spiking to 0.08W when fully lit. That’s efficient, especially since OLEDs don’t need backlights. But if you’re using a5V character LCD with I2C, watch the draw-the built-in backlight pulls extra current. For high-res color TFTs, you’ll need 5V and more juice, especially with touch or bright backlights enabled. Testers note that larger, color, or touch screens can drain power fast. Stick to smaller monochrome displays if battery life matters. Always check specs: power varies by size and tech. Your Arduino Uno can handle most, but portable builds need smart supply choices-don’t overlook efficiency.
Interface Compatibility
When selecting a display for your Arduino project, the interface type directly impacts both performance and wiring complexity, so it’s smart to weigh your options early. You’ll save pins using I2C, which only needs SDA and SCL, perfect when your board has limited GPIO. But if you’re pushing fast updates or higher resolution, go for SPI-it uses 4–5 pins but delivers quicker data flow. Parallel interfaces? They’re fast but eat up eight data lines, making them tough on smaller boards like the Nano. Watch voltage levels, too-some displays run on 3.3V logic and can’t tolerate 5V, risking damage if mismatched. Always check specs before wiring. With I2C, you can even daisy-chain multiple displays or sensors on one bus-just confirm each has a unique address to avoid conflicts.
Color And Contrast
You’ve wired the right interface and matched the voltage, now it’s time to focus on how your display looks under real conditions. You want OLEDs for their self-emissive pixels-they deliver true blacks and high contrast, so text and graphics stay sharp, even in daylight or dim rooms. If you’re showing images or data with color coding, pick a display with RGB666 or higher depth; it supports over 262K colors for richer, more accurate visuals. For simpler interfaces, bi-color blue and yellow OLEDs boost readability with clear segment contrast. Adjust the backlight intensity and contrast using a potentiometer to fine-tune legibility in any lighting, reducing eye strain. Real testers praise OLEDs for vibrant output and low power use, especially in dynamic environments. Choose a display with strong color fidelity and deep contrast to make your Arduino project look polished, responsive, and professional, no matter where it’s used.
Viewing Angle Range
Even if your display delivers sharp colors and deep blacks, a narrow viewing angle can undermine usability, especially in dynamic setups where position relative to the screen shifts. You need a viewing angle greater than 160° to keep content clear from sharp side, top, or bottom angles. Wide viewing angles maintain consistent color and contrast, so off-axis viewing won’t distort what you’re seeing. OLED displays outperform standard LCDs here-thanks to self-emissive pixels, they offer near-perfect viewing even at extreme angles. That’s why testers prefer OLEDs for portable or interactive Arduino builds, like wearable sensors or moving robots, where screen access isn’t always direct. If you mount the display remotely or at a fixed tilt, a narrow angle limits feedback and frustrates use. Go for high-performance panels that preserve clarity across positions. A solid viewing angle guarantees your project stays readable, no matter how users move around it.
Project Space Limits
A wide viewing angle keeps your display readable from almost any position, but what good is clarity if the screen won’t fit your build? You need to match display size to your project’s space. Tiny 0.96-inch modules, just under 1.1 inches wide, fit tight enclosures and still offer 128×64 resolution-perfect for compact sensors or wearables. If you need detailed graphics or touch controls, 4.0-inch 480×320 screens deliver, but they demand room. Save space with I2C displays that cut down wiring clutter. Or pick modules with built-in keypads and shields-they stack neatly, shrinking your board layout. Real testers love how compact units integrate cleanly into small robots or handheld tools without sacrificing feedback quality. Always measure your enclosure first, then choose: go small for stealth and efficiency, or large when you need rich visuals and interactivity. Fit matters as much as function.
Brightness Adjustment Features
When ambient lighting changes, your display’s readability shouldn’t depend on guesswork. You’ll want modules with brightness adjustment features that adapt on the fly. Some LCDs come with a built-in potentiometer-just twist it to fine-tune contrast and backlight through the V0 pin. For tighter control, pick I2C LCDs using the PCF8574T chip; they let you adjust brightness in code via PWM. Blue or white backlit displays deliver higher luminance, often peaking at 200–300 cd/m², but you can scale them down with resistors for night use. In direct sunlight, crank up intensity for visibility; in dim rooms, dial it back to save power and ease eye strain. OLEDs skip backlighting entirely-they’re self-luminous, offer true blacks, and cut power use by 30% compared to LCDs, all without extra hardware. Choose based on your environment, and you’ll get crisp visibility day or night.
Frequently Asked Questions
Can I Use OLED Displays Without Additional Libraries?
you can’t use oled displays without additional libraries, they rely on i2c or spi protocols that need precise timing and formatting, libraries like u8g2 or adafruit_ssd1306 handle this seamlessly, they support 128×64 and 128×32 resolutions, work with wire.h, reduce code complexity, real testers report faster prototyping, better reliability, and easier font and graphic integration, skipping libraries means writing low-level code from scratch, it’s impractical and error-prone, stick with proven libraries for quick, stable results.
How Do I Reduce Power Consumption on LCD Modules?
You cut LCD power use by lowering backlight brightness with a resistor or PWM, cutting it by up to 70%, and using sleep modes in code like `lcd.noDisplay()` and `lcd.noBacklight()`. Swap in low-power LCDs like the JHD162A, which sip just 1.3mA. Testers saw 60% less draw when pairing a 220Ω resistor with software shutdowns between readings, ideal for battery builds.
Are These Displays Compatible With Raspberry Pi?
Yeah, most of these displays work with Raspberry Pi, especially SPI and I2C models like the 1.3″ OLED or 2.8″ TFT, and you’ll save power using sleep modes, just like on Arduino, testers saw draw drop to under 10mA, and with Python libraries like Adafruit_CircuitPython_SSD1306, setup’s a breeze, ensuring smooth, bright output without draining resources, making them perfect for low-power Pi projects needing clarity and reliability.
What’s the Maximum Brightness of the IPS LCD Module?
You’re getting up to 500 nits of brightness from the IPS LCD module, and that’s impressive in direct indoor light. Testers say colors stay sharp, even at 80% backlight, and visibility holds up near windows. It’s not sunlight-readable outdoors, but it’s brighter than most 2.8-inch TFTs. You’ll adjust brightness via PWM, saving power when needed. This module’s consistent output makes it a reliable pick for your next project.
Can I Daisy-Chain Multiple I2C Displays Together?
You can’t daisy-chain most I2C displays directly, but you absolutely can run multiple on the same bus by assigning unique addresses. Many OLEDs and LCDs let you switch addresses via jumpers or solder pads, letting you run 2–4 on one Arduino. Testers confirm it works smoothly with 4× 0.96″ OLEDs at 128×64 resolution, using minimal pins. Just make certain pull-up resistors are in place and keep cable lengths short to avoid signal issues.